Photon 네트워크(클래식) 초보자 가이드
Photon Network는 개발자가 실시간 멀티플레이어 게임을 만들 수 있는 Unity용 서비스입니다.
강력하고 사용하기 쉬운 API를 제공하므로 초보 개발자에게도 완벽합니다.
이번 포스팅에서는 필요한 파일을 다운로드하고, Photon AppID를 설정하고, 간단한 멀티플레이어 예제를 프로그래밍하는 과정을 진행하겠습니다.
1부: Photon 네트워크 설정
첫 번째 단계는 Asset Store에서 Photon Network 패키지를 다운로드하는 것입니다. 여기에는 멀티플레이어 통합에 필요한 모든 스크립트와 파일이 포함되어 있습니다.
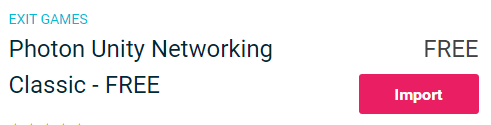
- Unity 프로젝트를 연 다음 Asset Store: (창 -> 일반 -> AssetStore)로 이동하거나 Ctrl+9를 누릅니다.
- "Photon Unity Networking Classic - Free"를 검색한 후 첫 번째 결과를 클릭하거나 여기를 클릭하세요.
- 다운로드가 완료된 후 Photon 패키지를 가져옵니다.

- 패키지를 가져온 후 Photon 앱 ID를 생성해야 하며 해당 웹사이트에서 수행됩니다: https://www.photonengine.com/
- 새 계정 만들기(또는 기존 계정에 로그인)
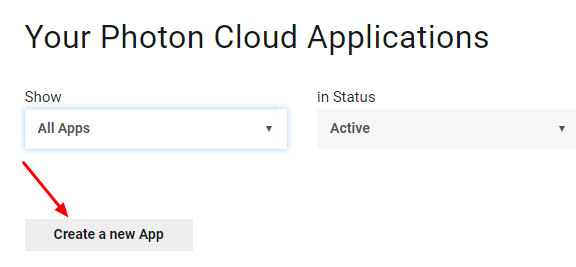
- 프로필 아이콘을 클릭한 후 "Your Applications"을 클릭하여 애플리케이션 페이지로 이동하거나 다음 링크를 따르세요: https://dashboard.photonengine.com/en-US/PublicCloud
- 애플리케이션 페이지에서 클릭하세요. "Create new app"
- 생성 페이지에서 Photon Type으로 "Photon Realtime"를 선택하고 Name으로 이름을 입력한 후 클릭합니다. "Create"

보시다시피, 애플리케이션은 기본적으로 무료 플랜으로 설정되어 있습니다. 가격 플랜 에 대한 자세한 내용은 여기에서 확인할 수 있습니다.
- 애플리케이션이 생성되면 앱 이름 아래에 있는 앱 ID를 복사하세요.

- Unity 프로젝트로 돌아가서 Window -> Photon Unity Networking -> PUN Wizard로 이동합니다.
- PUN 마법사에서 "Setup Project"를 클릭하고 앱 ID를 붙여넣은 다음 클릭하세요. "Setup Project"
- Photon 네트워크가 이제 준비되었습니다
2부: 멀티플레이어 게임 만들기
이제 실제로 멀티플레이어 게임을 만드는 부분으로 넘어가겠습니다.
Photon에서 멀티플레이어를 처리하는 방식은 다음과 같습니다:
- 먼저 로비라고도 알려진 Photon 지역(예: 미국 동부, 유럽, 아시아 등)에 연결합니다.
- 로비에 들어가면 해당 지역에 생성된 모든 룸을 요청한 다음 룸 중 하나에 참여하거나 자체 룸을 만들 수 있습니다.
- 룸에 참여한 후 룸에 연결된 플레이어 목록을 요청하고 플레이어 인스턴스를 인스턴스화한 다음 PhotonView를 통해 로컬 인스턴스와 동기화합니다.
- 누군가가 룸을 떠나면 해당 인스턴스는 파괴되고 플레이어 목록에서 제거됩니다.
1. 로비 설정
로비 로직(기존 룸 찾아보기, 새 룸 생성 등)을 포함하는 MainMenu를 생성하는 것부터 시작해 보겠습니다.
- 새로운 Scene을 생성하고 호출하세요. "MainMenu"
- 새로운 C# 스크립트를 생성하고 GameLobby라고 부릅니다.
- MainMenu 장면에서 새 GameObject를 만듭니다. 이름을 "_GameLobby"로 지정하고 GameLobby 스크립트를 연결하세요.
이제 GameLobby 스크립트를 엽니다.
먼저 필요한 모든 변수를 만들어 보겠습니다.
    //Our player name
    string playerName = "Player 1";
    //This client's version number. Users are separated from each other by gameversion (which allows you to make breaking changes).
    string gameVersion = "0.9";
    //The list of created rooms
    RoomInfo[] createdRooms = new RoomInfo[0];
    //Use this name when creating a Room
    string roomName = "Room 1";
    Vector2 roomListScroll = Vector2.zero;
    bool joiningRoom = false;
다음으로 해야 할 일은 Auto-Join Lobby 및 Lobby Stats를 활성화하는 것입니다. 그러면 방 목록을 받을 수 있습니다. 이는 void Start()에서 수행됩니다.
또한 automaticSyncScene을 활성화하여 Room에 참여하면 장면이 자동으로 동기화됩니다.
마지막으로 PhotonNetwork.ConnectUsingSettings를 호출하여 연결합니다.
    // Use this for initialization
    void Start()
    {
        //Automatically join Lobby after we connect to Photon Region
        PhotonNetwork.PhotonServerSettings.JoinLobby = true;
        //Enable Lobby Stats to receive the list of Created rooms
        PhotonNetwork.PhotonServerSettings.EnableLobbyStatistics = true;
        //This makes sure we can use PhotonNetwork.LoadLevel() on the master client and all clients in the same room sync their level automatically
        PhotonNetwork.automaticallySyncScene = true;

        if (!PhotonNetwork.connected)
        {
            // Connect to the photon master-server. We use the settings saved in PhotonServerSettings (a .asset file in this project)
            PhotonNetwork.ConnectUsingSettings(gameVersion);
        }
    }
Photon Cloud 연결이 성공했는지 확인하려면 다음 2개의 콜백을 구현해야 합니다: OnReceivedRoomListUpdate() 및 OnFailedToConnectToPhoton(객체 매개변수).
    void OnFailedToConnectToPhoton(object parameters)
    {
        Debug.Log("OnFailedToConnectToPhoton. StatusCode: " + parameters + " ServerAddress: " + PhotonNetwork.ServerAddress);
        //Try to connect again
        PhotonNetwork.ConnectUsingSettings(gameVersion);
    }

    void OnReceivedRoomListUpdate()
    {
        Debug.Log("We have received the Room list");
        //After this callback, PhotonNetwork.GetRoomList() becomes available
        createdRooms = PhotonNetwork.GetRoomList();
    }
다음은 Room 탐색 및 Room 생성이 수행되는 UI 부분입니다.

마지막으로 또 다른 4개의 콜백을 구현합니다: OnPhotonCreateRoomFailed(), OnPhotonJoinRoomFailed(object[] cause), OnCreatedRoom() 및 OnJoinedRoom().
이러한 콜백은 우리가 룸에 참여/생성했는지 또는 연결 중에 문제가 있었는지 확인하는 데 사용됩니다.
    void OnPhotonCreateRoomFailed()
    {
        Debug.Log("OnPhotonCreateRoomFailed got called. This can happen if the room exists (even if not visible). Try another room name.");
        joiningRoom = false;
    }

    void OnPhotonJoinRoomFailed(object[] cause)
    {
        Debug.Log("OnPhotonJoinRoomFailed got called. This can happen if the room is not existing or full or closed.");
        joiningRoom = false;
    }

    void OnCreatedRoom()
    {
        Debug.Log("OnCreatedRoom");
        //Set our player name
        PhotonNetwork.playerName = playerName;
        //Load the Scene called GameLevel (Make sure it's added to build settings)
        PhotonNetwork.LoadLevel("GameLevel");
    }

    void OnJoinedRoom()
    {
        Debug.Log("OnJoinedRoom");
    }
다음은 최종 GameLobby.cs 스크립트입니다.
using System.Collections;
using System.Collections.Generic;
using UnityEngine;

public class GameLobby : MonoBehaviour
{
    //Our player name
    string playerName = "Player 1";
    //This client's version number. Users are separated from each other by gameversion (which allows you to make breaking changes).
    string gameVersion = "0.9";
    //The list of created rooms
    RoomInfo[] createdRooms = new RoomInfo[0];
    //Use this name when creating a Room
    string roomName = "Room 1";
    Vector2 roomListScroll = Vector2.zero;
    bool joiningRoom = false;

    // Use this for initialization
    void Start()
    {
        //Automatically join Lobby after we connect to Photon Region
        PhotonNetwork.PhotonServerSettings.JoinLobby = true;
        //Enable Lobby Stats to receive the list of Created rooms
        PhotonNetwork.PhotonServerSettings.EnableLobbyStatistics = true;
        //This makes sure we can use PhotonNetwork.LoadLevel() on the master client and all clients in the same room sync their level automatically
        PhotonNetwork.automaticallySyncScene = true;

        if (!PhotonNetwork.connected)
        {
            // Connect to the photon master-server. We use the settings saved in PhotonServerSettings (a .asset file in this project)
            PhotonNetwork.ConnectUsingSettings(gameVersion);
        }
    }

    void OnFailedToConnectToPhoton(object parameters)
    {
        Debug.Log("OnFailedToConnectToPhoton. StatusCode: " + parameters + " ServerAddress: " + PhotonNetwork.ServerAddress);
        //Try to connect again
        PhotonNetwork.ConnectUsingSettings(gameVersion);
    }

    void OnReceivedRoomListUpdate()
    {
        Debug.Log("We have received the Room list");
        //After this callback, PhotonNetwork.GetRoomList() becomes available
        createdRooms = PhotonNetwork.GetRoomList();
    }

    void OnGUI()
    {
        GUI.Window(0, new Rect(Screen.width/2 - 450, Screen.height/2 - 200, 900, 400), LobbyWindow, "Lobby");
    }

    void LobbyWindow(int index)
    {
        //Connection Status and Room creation Button
        GUILayout.BeginHorizontal();

            GUILayout.Label("Status: " + PhotonNetwork.connectionStateDetailed);

            if(joiningRoom || !PhotonNetwork.connected)
            {
                GUI.enabled = false;
            }

            GUILayout.FlexibleSpace();

            //Room name text field
            roomName = GUILayout.TextField(roomName, GUILayout.Width(250));

            if (GUILayout.Button("Create Room", GUILayout.Width(125)))
            {
                if (roomName != "")
                {
                    joiningRoom = true;

                    RoomOptions roomOptions = new RoomOptions();
                    roomOptions.IsOpen = true;
                    roomOptions.IsVisible = true;
                    roomOptions.MaxPlayers = (byte)10; //Set any number

                    PhotonNetwork.JoinOrCreateRoom(roomName, roomOptions, TypedLobby.Default);
                }
            }

        GUILayout.EndHorizontal();

        //Scroll through available rooms
        roomListScroll = GUILayout.BeginScrollView(roomListScroll, true, true);

            if(createdRooms.Length == 0)
            {
                GUILayout.Label("No Rooms were created yet...");
            }
            else
            {
                for(int i = 0; i < createdRooms.Length; i++)
                {
                    GUILayout.BeginHorizontal("box");
                    GUILayout.Label(createdRooms[i].Name, GUILayout.Width(400));
                    GUILayout.Label(createdRooms[i].PlayerCount + "/" + createdRooms[i].MaxPlayers);

                    GUILayout.FlexibleSpace();

                    if (GUILayout.Button("Join Room"))
                    {
                        joiningRoom = true;

                        //Set our Player name
                        PhotonNetwork.playerName = playerName;

                        //Join the Room
                        PhotonNetwork.JoinRoom(createdRooms[i].Name);
                    }
                    GUILayout.EndHorizontal();
                }
            }

        GUILayout.EndScrollView();

        //Set player name and Refresh Room button
        GUILayout.BeginHorizontal();

            GUILayout.Label("Player Name: ", GUILayout.Width(85));
            //Player name text field
            playerName = GUILayout.TextField(playerName, GUILayout.Width(250));

            GUILayout.FlexibleSpace();

            GUI.enabled = PhotonNetwork.connectionState != ConnectionState.Connecting && !joiningRoom;
            if (GUILayout.Button("Refresh", GUILayout.Width(100)))
            {
                if (PhotonNetwork.connected)
                {
                    //We are already connected, simply update the Room list
                    createdRooms = PhotonNetwork.GetRoomList();
                }
                else
                {
                    //We are not connected, estabilish a new connection
                    PhotonNetwork.ConnectUsingSettings(gameVersion);
                }
            }

        GUILayout.EndHorizontal();

        if (joiningRoom)
        {
            GUI.enabled = true;
            GUI.Label(new Rect(900/2 - 50, 400/2 - 10, 100, 20), "Connecting...");
        }
    }

    void OnPhotonCreateRoomFailed()
    {
        Debug.Log("OnPhotonCreateRoomFailed got called. This can happen if the room exists (even if not visible). Try another room name.");
        joiningRoom = false;
    }

    void OnPhotonJoinRoomFailed(object[] cause)
    {
        Debug.Log("OnPhotonJoinRoomFailed got called. This can happen if the room is not existing or full or closed.");
        joiningRoom = false;
    }

    void OnCreatedRoom()
    {
        Debug.Log("OnCreatedRoom");
        //Set our player name
        PhotonNetwork.playerName = playerName;
        //Load the Scene called GameLevel (Make sure it's added to build settings)
        PhotonNetwork.LoadLevel("GameLevel");
    }

    void OnJoinedRoom()
    {
        Debug.Log("OnJoinedRoom");
    }
}
2. 플레이어 프리팹 만들기
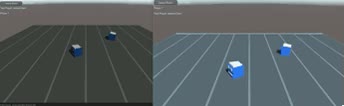
멀티플레이어 게임에서 플레이어 인스턴스에는 로컬과 원격이라는 두 가지 측면이 있습니다.
로컬 인스턴스는 로컬에서 (당사가) 제어합니다.
반면에 원격 인스턴스는 다른 플레이어가 수행하는 작업을 로컬로 표현한 것입니다. 이는 우리의 입력에 영향을 받지 않아야 합니다.
인스턴스가 로컬인지 원격인지 확인하기 위해 PhotonView 구성 요소를 사용합니다.
PhotonView는 동기화가 필요한 값(예: 위치 및 회전)을 수신하고 전송하는 메신저 역할을 합니다.
이제 플레이어 인스턴스를 생성하는 것부터 시작해 보겠습니다(이미 플레이어 인스턴스가 준비되어 있으면 이 단계를 건너뛸 수 있습니다).
내 경우 Player 인스턴스는 W, S 키로 이동하고 A, D 키로 회전하는 간단한 큐브가 됩니다.


다음은 간단한 컨트롤러 스크립트입니다.
PlayerController.cs
using UnityEngine;

public class PlayerController : MonoBehaviour
{
    // Update is called once per frame
    void Update()
    {
        //Move Front/Back
        if (Input.GetKey(KeyCode.W))
        {
            transform.Translate(transform.forward * Time.deltaTime * 2.45f, Space.World);
        }
        else if (Input.GetKey(KeyCode.S))
        {
            transform.Translate(-transform.forward * Time.deltaTime * 2.45f, Space.World);
        }

        //Rotate Left/Right
        if (Input.GetKey(KeyCode.A))
        {
            transform.Rotate(new Vector3(0, -14, 0) * Time.deltaTime * 4.5f, Space.Self);
        }
        else if (Input.GetKey(KeyCode.D))
        {
            transform.Rotate(new Vector3(0, 14, 0) * Time.deltaTime * 4.5f, Space.Self);
        }
    }
}
다음 단계는 PhotonView 컴포넌트를 추가하는 것입니다.
- 플레이어 인스턴스에 PhotonView 컴포넌트를 추가
- 새로운 C# 스크립트를 생성하고 PlayerNetworkSync라고 부르고 엽니다(이 스크립트는 PhotonView를 통해 통신하는 데 사용됩니다)
가장 먼저 해야 할 일은 MonoBehaviour를 Photon.MonoBehaviour로 바꾸는 것입니다. GetComponent<PhotonView>()를 사용하는 대신 캐시된 photonView 변수를 사용하려면 이 단계가 필요합니다.
public class PlayerNetworkSync : Photon.MonoBehaviour그런 다음 필요한 모든 변수를 생성하도록 이동할 수 있습니다.
    //List of the scripts that should only be active for the local player (ex. PlayerController, MouseLook etc.)
    public MonoBehaviour[] localScripts;
    //List of the GameObjects that should only be active for the local player (ex. Camera, AudioListener etc.)
    public GameObject[] localObjects;
    //Values that will be synced over network
    Vector3 latestPos;
    Quaternion latestRot;
그런 다음 void Start()에서 photonView.isMine을 사용하여 플레이어가 로컬인지 원격인지 확인합니다.
    // Use this for initialization
    void Start()
    {
        if (photonView.isMine)
        {
            //Player is local
        }
        else
        {
            //Player is Remote
            for(int i = 0; i < localScripts.Length; i++)
            {
                localScripts[i].enabled = false;
            }
            for (int i = 0; i < localObjects.Length; i++)
            {
                localObjects[i].SetActive(false);
            }
        }
    }
실제 동기화는 PhotonView의 콜백을 통해 이루어집니다: OnPhotonSerializeView(PhotonStream stream, PhotonMessageInfo info):
    void OnPhotonSerializeView(PhotonStream stream, PhotonMessageInfo info)
    {
        if (stream.isWriting)
        {
            //We own this player: send the others our data
            stream.SendNext(transform.position);
            stream.SendNext(transform.rotation);
        }
        else
        {
            //Network player, receive data
            latestPos = (Vector3)stream.ReceiveNext();
            latestRot = (Quaternion)stream.ReceiveNext();
        }
    }
이 경우 플레이어 위치 및 회전만 보내지만 위의 예를 사용하여 네트워크를 통해 동기화하는 데 필요한 값을 높은 빈도로 보낼 수 있습니다.
수신된 값은 void Update()에 적용됩니다.
    // Update is called once per frame
    void Update()
    {
        if (!photonView.isMine)
        {
            //Update remote player (smooth this, this looks good, at the cost of some accuracy)
            transform.position = Vector3.Lerp(transform.position, latestPos, Time.deltaTime * 5);
            transform.rotation = Quaternion.Lerp(transform.rotation, latestRot, Time.deltaTime * 5);
        }
    }
최종 PlayerNetworkSync.cs 스크립트는 다음과 같습니다.
using System.Collections;
using System.Collections.Generic;
using UnityEngine;

public class PlayerNetworkSync : Photon.MonoBehaviour
{
    //List of the scripts that should only be active for the local player (ex. PlayerController, MouseLook etc.)
    public MonoBehaviour[] localScripts;
    //List of the GameObjects that should only be active for the local player (ex. Camera, AudioListener etc.)
    public GameObject[] localObject;
    //Values that will be synced over network
    Vector3 latestPos;
    Quaternion latestRot;

    // Use this for initialization
    void Start()
    {
        if (photonView.isMine)
        {
            //Player is local
        }
        else
        {
            //Player is Remote
            for(int i = 0; i < localScripts.Length; i++)
            {
                localScripts[i].enabled = false;
            }
            for (int i = 0; i < localObject.Length; i++)
            {
                localObject[i].SetActive(false);
            }
        }
    }

    void OnPhotonSerializeView(PhotonStream stream, PhotonMessageInfo info)
    {
        if (stream.isWriting)
        {
            //We own this player: send the others our data
            stream.SendNext(transform.position);
            stream.SendNext(transform.rotation);
        }
        else
        {
            //Network player, receive data
            latestPos = (Vector3)stream.ReceiveNext();
            latestRot = (Quaternion)stream.ReceiveNext();
        }
    }

    // Update is called once per frame
    void Update()
    {
        if (!photonView.isMine)
        {
            //Update remote player (smooth this, this looks good, at the cost of some accuracy)
            transform.position = Vector3.Lerp(transform.position, latestPos, Time.deltaTime * 5);
            transform.rotation = Quaternion.Lerp(transform.rotation, latestRot, Time.deltaTime * 5);
        }
    }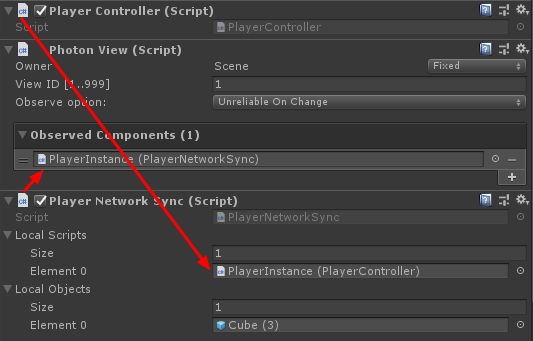
}- PlayerInstance에 PlayerNetworkSync.cs 스크립트를 추가하고 이를 PhotonView 관찰 구성 요소에 할당합니다.
- PlayerCntroller.cs를 "Local Scripts"에 할당하고 GameObject(원격 플레이어에 대해 비활성화하려는)를 "Local Objects"
- PlayerInstance를 Prefab에 저장하고 Resources라는 폴더로 이동합니다(해당 폴더가 없으면 새로 만듭니다). 이 단계는 네트워크를 통해 멀티플레이어 개체를 생성하는 데 필요합니다.

3. 게임 레벨 생성
GameLevel은 Room에 참여한 후 로드되는 Scene이며 모든 작업이 일어나는 곳입니다.
- 새 장면을 만들고 이름을 "GameLevel"으로 지정합니다(또는 다른 이름을 유지하려면 GameLobby.cs의 PhotonNetwork.LoadLevel("GameLevel") 줄에서 이름을 변경해야 합니다).
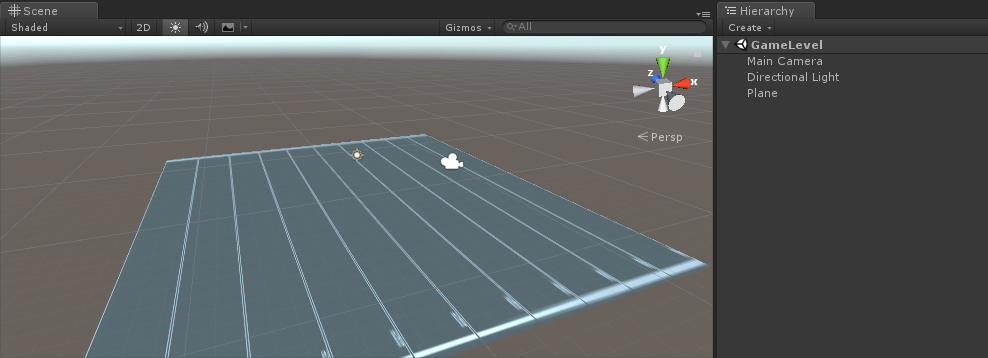
제 경우에는 평면이 있는 간단한 장면을 사용하겠습니다.
- 이제 새 스크립트를 만들고 RoomController라고 부릅니다. 이 스크립트는 Room 내부의 로직(플레이어 생성, 플레이어 목록 표시 등)을 처리합니다.
필요한 변수를 정의하는 것부터 시작해 보겠습니다.
    //Player instance prefab, must be located in the Resources folder
    public GameObject playerPrefab;
    //Player spawn point
    public Transform spawnPoint;
플레이어 프리팹을 인스턴스화하기 위해 PhotonNetwork.Instantiate를 사용합니다:
// Use this for initialization
void Start()
{
//In case we started this demo with the wrong scene being active, simply load the menu scene
if (!PhotonNetwork.connected)
{
UnityEngine.SceneManagement.SceneManager.LoadScene("MainMenu");
return;
}
//We're in a room. spawn a character for the local player. it gets synced by using PhotonNetwork.Instantiate
PhotonNetwork.Instantiate(playerPrefab.name, spawnPoint.position, Quaternion.identity, 0);
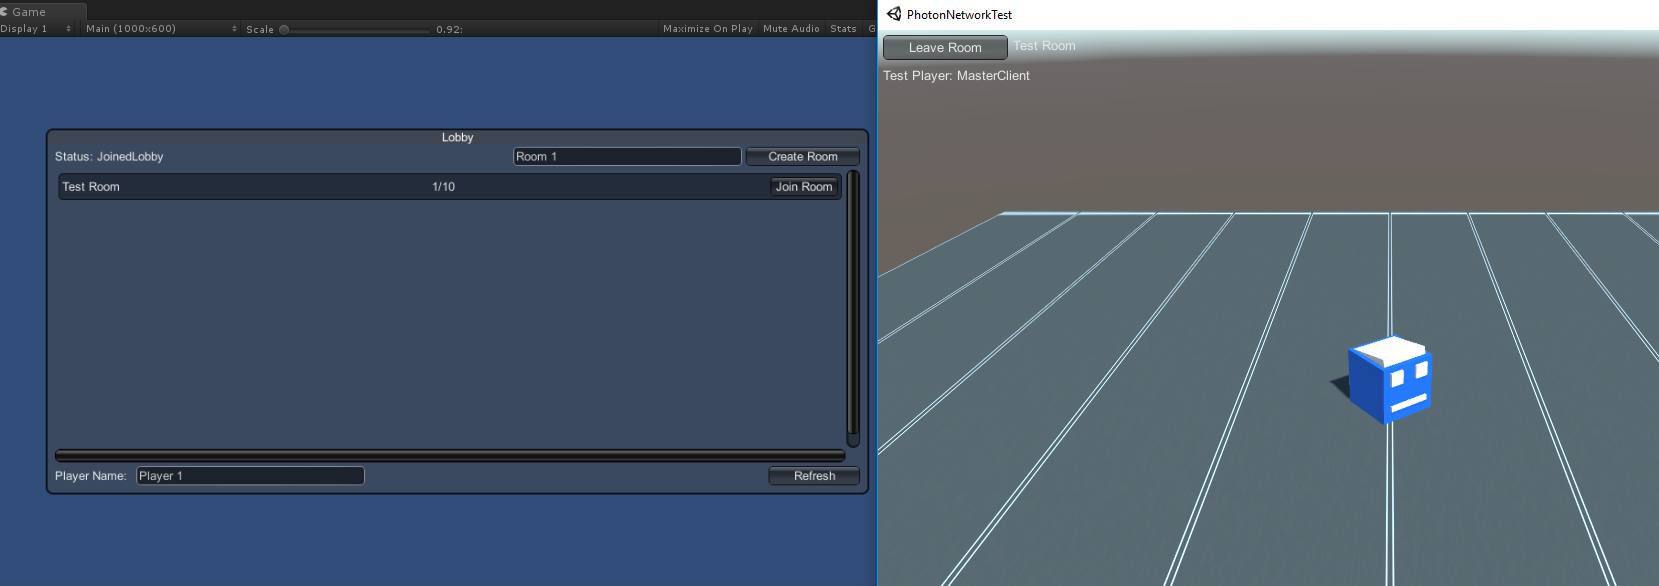
}"Leave Room" 버튼과 룸 이름, 연결된 플레이어 목록과 같은 몇 가지 추가 요소가 포함된 간단한 UI:
    void OnGUI()
    {
        if (PhotonNetwork.room == null)
            return;

        //Leave this Room
        if (GUI.Button(new Rect(5, 5, 125, 25), "Leave Room"))
        {
            PhotonNetwork.LeaveRoom();
        }

        //Show the Room name
        GUI.Label(new Rect(135, 5, 200, 25), PhotonNetwork.room.Name);

        //Show the list of the players connected to this Room
        for (int i = 0; i < PhotonNetwork.playerList.Length; i++)
        {
            //Show if this player is a Master Client. There can only be one Master Client per Room so use this to define the authoritative logic etc.)
            string isMasterClient = (PhotonNetwork.playerList[i].IsMasterClient ? ": MasterClient" : "");
            GUI.Label(new Rect(5, 35 + 30 * i, 200, 25), PhotonNetwork.playerList[i].NickName + isMasterClient);
        }
    }
그리고 마지막으로 Room을 나갈 때 호출되는 OnLeftRoom()라는 또 다른 PhotonNetwork 콜백을 구현합니다.
    void OnLeftRoom()
    {
        //We have left the Room, return to the MainMenu
        UnityEngine.SceneManagement.SceneManager.LoadScene("MainMenu");
    }
다음은 최종 RoomController.cs 스크립트입니다.
using UnityEngine;

public class RoomController : MonoBehaviour
{
    //Player instance prefab, must be located in the Resources folder
    public GameObject playerPrefab;
    //Player spawn point
    public Transform spawnPoint;

    // Use this for initialization
    void Start()
    {
        //In case we started this demo with the wrong scene being active, simply load the menu scene
        if (!PhotonNetwork.connected)
        {
            UnityEngine.SceneManagement.SceneManager.LoadScene("MainMenu");
            return;
        }

        //We're in a room. spawn a character for the local player. it gets synced by using PhotonNetwork.Instantiate
        PhotonNetwork.Instantiate(playerPrefab.name, spawnPoint.position, Quaternion.identity, 0);
    }

    void OnGUI()
    {
        if (PhotonNetwork.room == null)
            return;

        //Leave this Room
        if (GUI.Button(new Rect(5, 5, 125, 25), "Leave Room"))
        {
            PhotonNetwork.LeaveRoom();
        }

        //Show the Room name
        GUI.Label(new Rect(135, 5, 200, 25), PhotonNetwork.room.Name);

        //Show the list of the players connected to this Room
        for (int i = 0; i < PhotonNetwork.playerList.Length; i++)
        {
            //Show if this player is a Master Client. There can only be one Master Client per Room so use this to define the authoritative logic etc.)
            string isMasterClient = (PhotonNetwork.playerList[i].IsMasterClient ? ": MasterClient" : "");
            GUI.Label(new Rect(5, 35 + 30 * i, 200, 25), PhotonNetwork.playerList[i].NickName + isMasterClient);
        }
    }

    void OnLeftRoom()
    {
        //We have left the Room, return to the MainMenu
        UnityEngine.SceneManagement.SceneManager.LoadScene("MainMenu");
    }
}- 마지막으로 GameLevel 장면에 새 GameObject를 만들고 호출합니다. "_RoomController"
- RoomController 스크립트를 _RoomController 개체에 연결
- PlayerInstance 프리팹과 SpawnPoint Transform을 할당한 다음 장면을 저장합니다.
- MainMenu와 GameLevel을 모두 빌드 설정에 추가합니다.

4. 테스트 빌드 만들기
이제 빌드하고 테스트할 차례입니다.
모든 것이 예상대로 작동합니다!
보너스
RPC
Photon 네트워크에서 RPC는 Remote Procedure Call을 의미하며, 같은 공간에 있는 원격 클라이언트의 기능을 호출하는 데 사용됩니다(자세한 내용은 여기에서 확인할 수 있습니다).
RPC는 다양한 용도로 사용됩니다. 예를 들어 Room에 있는 모든 플레이어에게 채팅 메시지를 보내야 한다고 가정해 보겠습니다. RPC를 사용하면 쉽게 할 수 있습니다.
[PunRPC]
void ChatMessage(string senderName, string messageText)
{
    Debug.Log(string.Format("{0}: {1}", senderName, messageText));
}
함수 앞에 [PunRPC]가 있는지 확인하세요. 이 속성은 RPC를 통해 함수를 호출하려는 경우 필요합니다.
RPC로 표시된 함수를 호출하려면 PhotonView가 필요합니다. 호출 예시:
PhotonView photonView = PhotonView.Get(this);
photonView.RPC("ChatMessage", PhotonTargets.All, PhotonNetwork.playerName, "Some message");
전문가 팁: 스크립트가 Photon.MonoBehaviour 또는 Photon.PunBehaviour인 경우 this.photonView.RPC()를 사용할 수 있습니다.
사용자 정의 속성
Photon Network에서 사용자 정의 속성은 플레이어나 룸에 할당할 수 있는 해시 테이블입니다.
이는 자주 변경할 필요가 없는 영구 데이터(예: 플레이어 팀 이름, 룸 게임 모드 등)를 설정해야 할 때 유용합니다.
먼저 스크립트 시작 부분에 아래 줄을 추가하여 Hashtable을 정의해야 합니다.
//Replace default Hashtables with Photon hashtables
using Hashtable = ExitGames.Client.Photon.Hashtable;
아래 예에서는 "GameMode" 및 "AnotherProperty"이라는 Room 속성을 설정합니다.
        //Set Room properties (Only Master Client is allowed to set Room properties)
        if (PhotonNetwork.isMasterClient)
        {
            Hashtable setRoomProperties = new Hashtable();
            setRoomProperties.Add("GameMode", "FFA");
            setRoomProperties.Add("AnotherProperty", "Test");
            PhotonNetwork.room.SetCustomProperties(setRoomProperties);
        }

        //Will print "FFA"
        print((string)PhotonNetwork.room.CustomProperties["GameMode"]);
        //Will print "Test"
        print((string)PhotonNetwork.room.CustomProperties["AnotherProperty"]);
플레이어 속성은 비슷하게 설정됩니다.
        //Set our Player's property
        Hashtable setPlayerProperties = new Hashtable();
        setPlayerProperties.Add("PlayerHP", (float)100);
        PhotonNetwork.player.SetCustomProperties(setPlayerProperties);

        //Will print "100"
        print((float)PhotonNetwork.player.CustomProperties["PlayerHP"]);
특정 속성을 제거하려면 해당 값을 null로 설정하면 됩니다.
        //Remove property called "PlayerHP" from Player properties
        Hashtable setPlayerProperties = new Hashtable();
        setPlayerProperties.Add("PlayerHP", null);
        PhotonNetwork.player.SetCustomProperties(setPlayerProperties);