PUN 2로 멀티플레이어 자동차 게임 만들기
Unity에서 멀티플레이어 게임을 만드는 것은 복잡한 작업이지만 다행히도 여러 솔루션이 개발 프로세스를 단순화합니다.
그러한 솔루션 중 하나가 Photon Network입니다. 특히 PUN 2라는 API의 최신 릴리스는 서버 호스팅을 관리하고 원하는 방식으로 멀티플레이어 게임을 자유롭게 만들 수 있도록 해줍니다.
이 튜토리얼에서는 PUN 2를 사용하여 물리 동기화를 통해 간단한 자동차 게임을 만드는 방법을 보여 드리겠습니다.
Unity 이 튜토리얼에서 사용된 버전: Unity 2018.3.0f2(64비트)
1부: PUN 2 설정
첫 번째 단계는 Asset Store에서 PUN 2 패키지를 다운로드하는 것입니다. 여기에는 멀티플레이어 통합에 필요한 모든 스크립트와 파일이 포함되어 있습니다.
- Unity 프로젝트를 연 다음 Asset Store로 이동합니다: (Window -> General -> AssetStore) 또는 Ctrl+9를 누릅니다.
- "PUN 2- Free"을 검색한 다음 첫 번째 결과를 클릭하거나 여기를 클릭하세요.
- 다운로드가 완료된 후 PUN 2 패키지를 가져옵니다.


- 패키지를 가져온 후 Photon 앱 ID를 생성해야 하며 해당 웹사이트에서 수행됩니다: https://www.photonengine.com/
- 새 계정 만들기(또는 기존 계정에 로그인)
- 프로필 아이콘을 클릭한 후 "Your Applications"을 클릭하여 애플리케이션 페이지로 이동하거나 다음 링크를 따르세요: https://dashboard.photonengine.com/en-US/PublicCloud
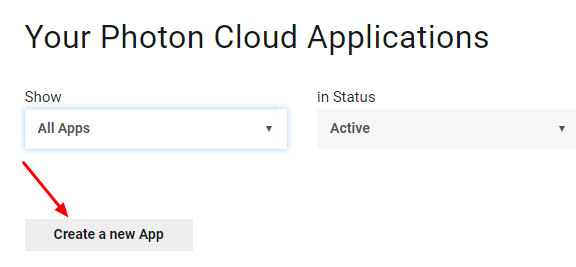
- 애플리케이션 페이지에서 클릭하세요. "Create new app"
- 생성 페이지에서 Photon Type으로 "Photon Realtime"를 선택하고 Name으로 이름을 입력한 후 클릭합니다. "Create"

보시다시피, 애플리케이션은 기본적으로 무료 플랜으로 설정되어 있습니다. 가격 플랜 에 대한 자세한 내용은 여기에서 확인할 수 있습니다.
- 애플리케이션이 생성되면 앱 이름 아래에 있는 앱 ID를 복사하세요.

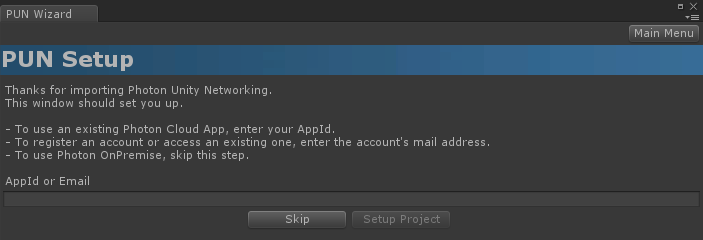
- Unity 프로젝트로 돌아가서 Window -> Photon Unity Networking -> PUN Wizard로 이동합니다.
- PUN 마법사에서 "Setup Project"를 클릭하고 앱 ID를 붙여넣은 다음 클릭하세요. "Setup Project"
이제 PUN 2가 준비되었습니다!
2부: 멀티플레이어 자동차 게임 만들기
1. 로비 설정
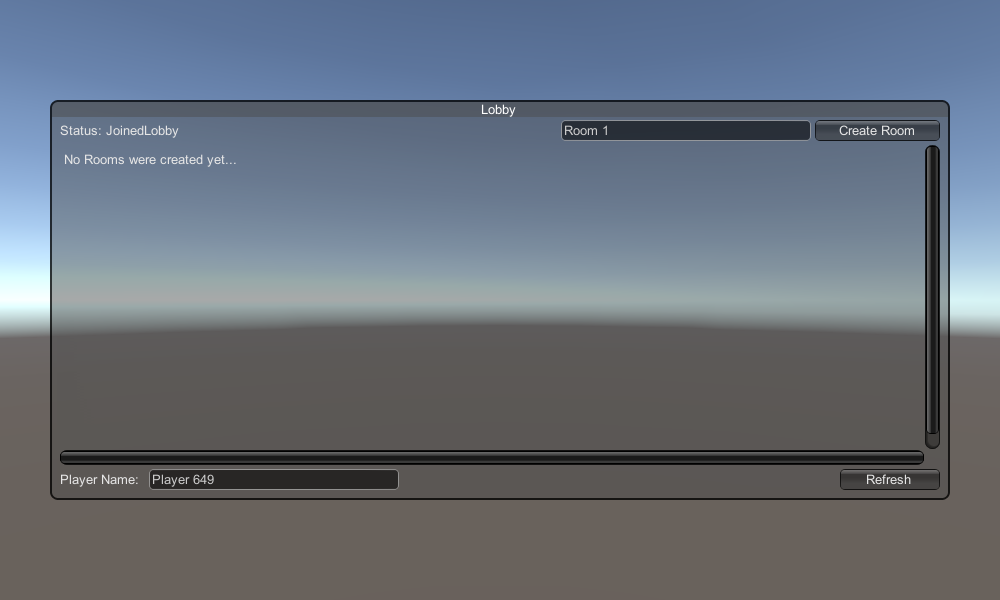
로비 로직(기존 룸 탐색, 새 룸 생성 등)을 포함하는 로비 장면을 생성하는 것부터 시작해 보겠습니다.
- 새로운 Scene을 생성하고 호출하세요. "GameLobby"
- "GameLobby" 장면에서 새 GameObject를 생성하고 호출합니다. "_GameLobby"
- 새 C# 스크립트를 만들고 "PUN2_GameLobby"이라고 명명한 다음 "_GameLobby" 개체에 연결합니다.
- "PUN2_GameLobby" 스크립트 안에 아래 코드를 붙여넣으세요.
PUN2_GameLobby.cs
using System.Collections.Generic;
using UnityEngine;
using Photon.Pun;
using Photon.Realtime;

public class PUN2_GameLobby : MonoBehaviourPunCallbacks
{

    //Our player name
    string playerName = "Player 1";
    //Users are separated from each other by gameversion (which allows you to make breaking changes).
    string gameVersion = "1.0";
    //The list of created rooms
    List<RoomInfo> createdRooms = new List<RoomInfo>();
    //Use this name when creating a Room
    string roomName = "Room 1";
    Vector2 roomListScroll = Vector2.zero;
    bool joiningRoom = false;

    // Use this for initialization
    void Start()
    {
        //Initialize Player name
        playerName = "Player " + Random.Range(111, 999);

        //This makes sure we can use PhotonNetwork.LoadLevel() on the master client and all clients in the same room sync their level automatically
        PhotonNetwork.AutomaticallySyncScene = true;

        if (!PhotonNetwork.IsConnected)
        {
            //Set the App version before connecting
            PhotonNetwork.PhotonServerSettings.AppSettings.AppVersion = gameVersion;
            PhotonNetwork.PhotonServerSettings.AppSettings.FixedRegion = "eu";
            // Connect to the photon master-server. We use the settings saved in PhotonServerSettings (a .asset file in this project)
            PhotonNetwork.ConnectUsingSettings();
        }
    }

    public override void OnDisconnected(DisconnectCause cause)
    {
        Debug.Log("OnFailedToConnectToPhoton. StatusCode: " + cause.ToString() + " ServerAddress: " + PhotonNetwork.ServerAddress);
    }

    public override void OnConnectedToMaster()
    {
        Debug.Log("OnConnectedToMaster");
        //After we connected to Master server, join the Lobby
        PhotonNetwork.JoinLobby(TypedLobby.Default);
    }

    public override void OnRoomListUpdate(List<RoomInfo> roomList)
    {
        Debug.Log("We have received the Room list");
        //After this callback, update the room list
        createdRooms = roomList;
    }

    void OnGUI()
    {
        GUI.Window(0, new Rect(Screen.width / 2 - 450, Screen.height / 2 - 200, 900, 400), LobbyWindow, "Lobby");
    }

    void LobbyWindow(int index)
    {
        //Connection Status and Room creation Button
        GUILayout.BeginHorizontal();

        GUILayout.Label("Status: " + PhotonNetwork.NetworkClientState);

        if (joiningRoom || !PhotonNetwork.IsConnected || PhotonNetwork.NetworkClientState != ClientState.JoinedLobby)
        {
            GUI.enabled = false;
        }

        GUILayout.FlexibleSpace();

        //Room name text field
        roomName = GUILayout.TextField(roomName, GUILayout.Width(250));

        if (GUILayout.Button("Create Room", GUILayout.Width(125)))
        {
            if (roomName != "")
            {
                joiningRoom = true;

                RoomOptions roomOptions = new RoomOptions();
                roomOptions.IsOpen = true;
                roomOptions.IsVisible = true;
                roomOptions.MaxPlayers = (byte)10; //Set any number

                PhotonNetwork.JoinOrCreateRoom(roomName, roomOptions, TypedLobby.Default);
            }
        }

        GUILayout.EndHorizontal();

        //Scroll through available rooms
        roomListScroll = GUILayout.BeginScrollView(roomListScroll, true, true);

        if (createdRooms.Count == 0)
        {
            GUILayout.Label("No Rooms were created yet...");
        }
        else
        {
            for (int i = 0; i < createdRooms.Count; i++)
            {
                GUILayout.BeginHorizontal("box");
                GUILayout.Label(createdRooms[i].Name, GUILayout.Width(400));
                GUILayout.Label(createdRooms[i].PlayerCount + "/" + createdRooms[i].MaxPlayers);

                GUILayout.FlexibleSpace();

                if (GUILayout.Button("Join Room"))
                {
                    joiningRoom = true;

                    //Set our Player name
                    PhotonNetwork.NickName = playerName;

                    //Join the Room
                    PhotonNetwork.JoinRoom(createdRooms[i].Name);
                }
                GUILayout.EndHorizontal();
            }
        }

        GUILayout.EndScrollView();

        //Set player name and Refresh Room button
        GUILayout.BeginHorizontal();

        GUILayout.Label("Player Name: ", GUILayout.Width(85));
        //Player name text field
        playerName = GUILayout.TextField(playerName, GUILayout.Width(250));

        GUILayout.FlexibleSpace();

        GUI.enabled = (PhotonNetwork.NetworkClientState == ClientState.JoinedLobby || PhotonNetwork.NetworkClientState == ClientState.Disconnected) && !joiningRoom;
        if (GUILayout.Button("Refresh", GUILayout.Width(100)))
        {
            if (PhotonNetwork.IsConnected)
            {
                //Re-join Lobby to get the latest Room list
                PhotonNetwork.JoinLobby(TypedLobby.Default);
            }
            else
            {
                //We are not connected, estabilish a new connection
                PhotonNetwork.ConnectUsingSettings();
            }
        }

        GUILayout.EndHorizontal();

        if (joiningRoom)
        {
            GUI.enabled = true;
            GUI.Label(new Rect(900 / 2 - 50, 400 / 2 - 10, 100, 20), "Connecting...");
        }
    }

    public override void OnCreateRoomFailed(short returnCode, string message)
    {
        Debug.Log("OnCreateRoomFailed got called. This can happen if the room exists (even if not visible). Try another room name.");
        joiningRoom = false;
    }

    public override void OnJoinRoomFailed(short returnCode, string message)
    {
        Debug.Log("OnJoinRoomFailed got called. This can happen if the room is not existing or full or closed.");
        joiningRoom = false;
    }

    public override void OnJoinRandomFailed(short returnCode, string message)
    {
        Debug.Log("OnJoinRandomFailed got called. This can happen if the room is not existing or full or closed.");
        joiningRoom = false;
    }

    public override void OnCreatedRoom()
    {
        Debug.Log("OnCreatedRoom");
        //Set our player name
        PhotonNetwork.NickName = playerName;
        //Load the Scene called Playground (Make sure it's added to build settings)
        PhotonNetwork.LoadLevel("Playground");
    }

    public override void OnJoinedRoom()
    {
        Debug.Log("OnJoinedRoom");
    }
}
2. 자동차 구조물 만들기
자동차 프리팹은 간단한 물리 컨트롤러를 사용합니다.
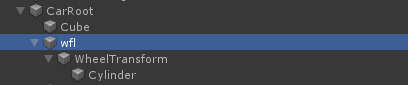
- 새로운 GameObject를 생성하고 호출합니다. "CarRoot"
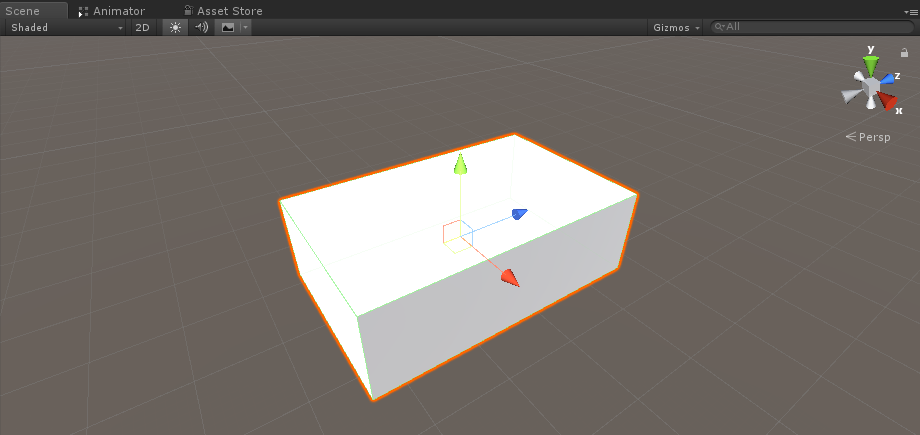
- 새 큐브를 만들고 "CarRoot" 개체 내부로 이동한 다음 Z 및 X축을 따라 크기를 늘립니다.
- 새로운 GameObject를 생성하고 이름을 "wfl"(Wheel Front Left의 약어)으로 지정합니다.
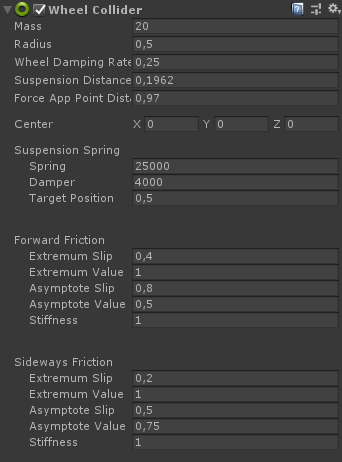
- "wfl" 개체에 Wheel Collider 구성 요소를 추가하고 아래 이미지에서 값을 설정합니다.

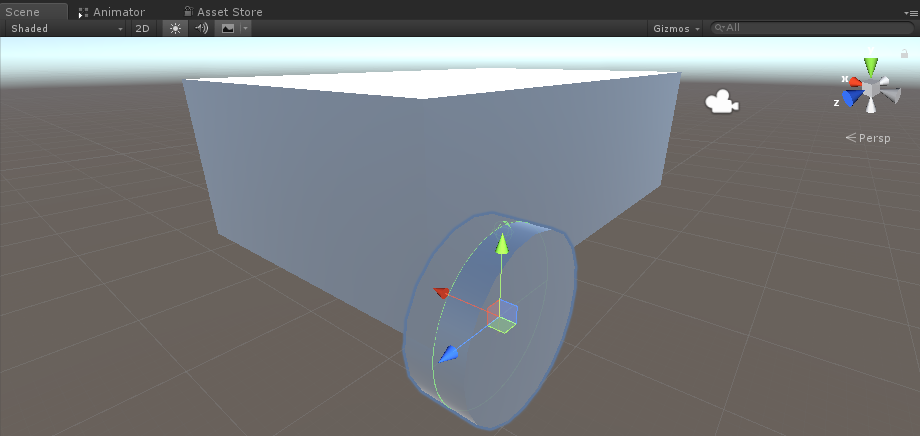
- 새로운 GameObject를 생성하고 이름을 "WheelTransform"로 바꾼 다음 "wfl" 객체 내부로 옮깁니다.
- 새 원통을 만들고 "WheelTransform" 개체 내부로 이동한 다음 Wheel Collider 치수와 일치할 때까지 회전하고 크기를 줄입니다. 제 경우에는 스케일이 (1, 0.17, 1)입니다.
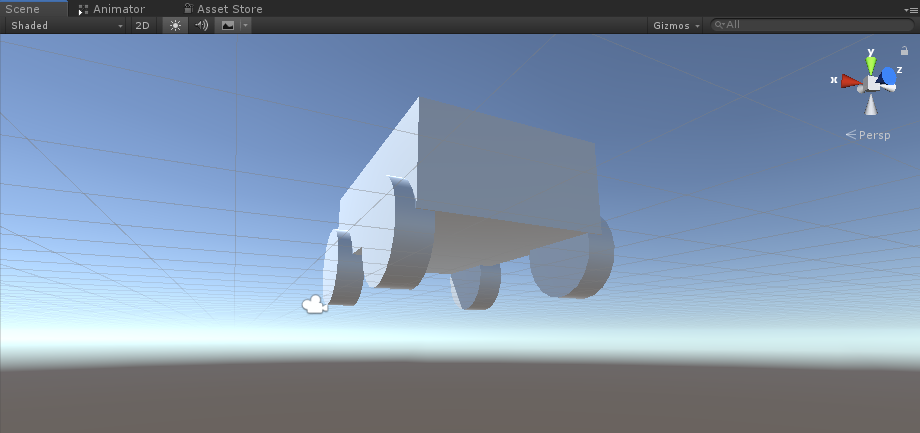
- 마지막으로 나머지 바퀴에 대해 "wfl" 개체를 3번 복제하고 각 개체의 이름을 각각 "wfr"(바퀴 앞 오른쪽), "wrr"(바퀴 뒤 오른쪽) 및 "wrl"(바퀴 뒤 왼쪽)으로 바꿉니다.
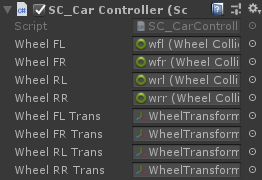
- 새 스크립트를 만들고 이름을 "SC_CarController"로 지정한 다음 그 안에 아래 코드를 붙여넣습니다.
SC_CarController.cs
using UnityEngine;
using System.Collections;

public class SC_CarController : MonoBehaviour
{
    public WheelCollider WheelFL;
    public WheelCollider WheelFR;
    public WheelCollider WheelRL;
    public WheelCollider WheelRR;
    public Transform WheelFLTrans;
    public Transform WheelFRTrans;
    public Transform WheelRLTrans;
    public Transform WheelRRTrans;
    public float steeringAngle = 45;
    public float maxTorque = 1000;
    public  float maxBrakeTorque = 500;
    public Transform centerOfMass;

    float gravity = 9.8f;
    bool braked = false;
    Rigidbody rb;

    void Start()
    {
        rb = GetComponent<Rigidbody>();
        rb.centerOfMass = centerOfMass.transform.localPosition;
    }

    void FixedUpdate()
    {
        if (!braked)
        {
            WheelFL.brakeTorque = 0;
            WheelFR.brakeTorque = 0;
            WheelRL.brakeTorque = 0;
            WheelRR.brakeTorque = 0;
        }
        //Speed of car, Car will move as you will provide the input to it.

        WheelRR.motorTorque = maxTorque * Input.GetAxis("Vertical");
        WheelRL.motorTorque = maxTorque * Input.GetAxis("Vertical");

        //Changing car direction
        //Here we are changing the steer angle of the front tyres of the car so that we can change the car direction.
        WheelFL.steerAngle = steeringAngle * Input.GetAxis("Horizontal");
        WheelFR.steerAngle = steeringAngle * Input.GetAxis("Horizontal");
    }
    void Update()
    {
        HandBrake();

        //For tyre rotate
        WheelFLTrans.Rotate(WheelFL.rpm / 60 * 360 * Time.deltaTime, 0, 0);
        WheelFRTrans.Rotate(WheelFR.rpm / 60 * 360 * Time.deltaTime, 0, 0);
        WheelRLTrans.Rotate(WheelRL.rpm / 60 * 360 * Time.deltaTime, 0, 0);
        WheelRRTrans.Rotate(WheelRL.rpm / 60 * 360 * Time.deltaTime, 0, 0);
        //Changing tyre direction
        Vector3 temp = WheelFLTrans.localEulerAngles;
        Vector3 temp1 = WheelFRTrans.localEulerAngles;
        temp.y = WheelFL.steerAngle - (WheelFLTrans.localEulerAngles.z);
        WheelFLTrans.localEulerAngles = temp;
        temp1.y = WheelFR.steerAngle - WheelFRTrans.localEulerAngles.z;
        WheelFRTrans.localEulerAngles = temp1;
    }
    void HandBrake()
    {
        //Debug.Log("brakes " + braked);
        if (Input.GetButton("Jump"))
        {
            braked = true;
        }
        else
        {
            braked = false;
        }
        if (braked)
        {

            WheelRL.brakeTorque = maxBrakeTorque * 20;//0000;
            WheelRR.brakeTorque = maxBrakeTorque * 20;//0000;
            WheelRL.motorTorque = 0;
            WheelRR.motorTorque = 0;
        }
    }
}- "CarRoot" 개체에 SC_CarController 스크립트를 연결합니다.
- Rigidbody 구성 요소를 "CarRoot" 개체에 연결하고 질량을 1000으로 변경합니다.
- SC_CarController에 바퀴 변수를 할당합니다(처음 4개 변수는 Wheel Collider, 나머지 4개는 WheelTransform)
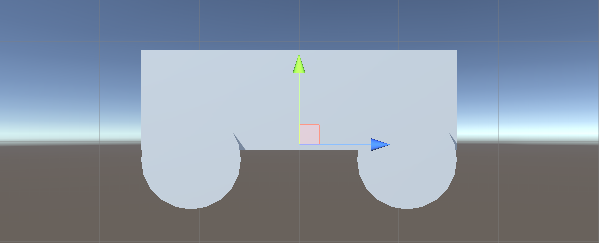
- Center of Mass 변수의 경우 새 GameObject를 생성하고 이름을 "CenterOfMass"으로 지정하고 "CarRoot" 객체 내부로 이동합니다.
- 다음과 같이 "CenterOfMass" 개체를 가운데 약간 아래쪽에 배치합니다.
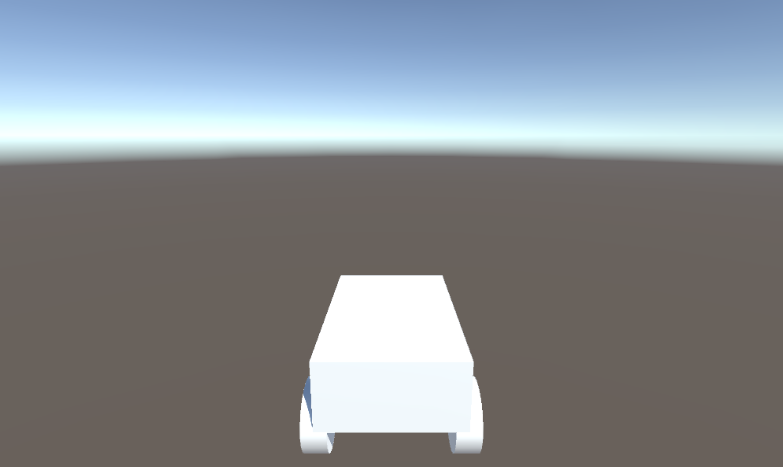
- 마지막으로 테스트 목적으로 기본 카메라를 "CarRoot" 개체 내부로 이동하고 자동차를 가리킵니다.
- 새 스크립트를 만들고 이름을 "PUN2_CarSync"으로 지정한 다음 그 안에 아래 코드를 붙여넣습니다.
PUN2_CarSync.cs
using System.Collections;
using System.Collections.Generic;
using UnityEngine;
using Photon.Pun;

public class PUN2_CarSync : MonoBehaviourPun, IPunObservable
{
    public MonoBehaviour[] localScripts; //Scripts that should only be enabled for the local player (Ex. Car controller)
    public GameObject[] localObjects; //Objects that should only be active for the local player (Ex. Camera)
    public Transform[] wheels; //Car wheel transforms

    Rigidbody r;
    // Values that will be synced over network
    Vector3 latestPos;
    Quaternion latestRot;
    Vector3 latestVelocity;
    Vector3 latestAngularVelocity;
    Quaternion[] wheelRotations = new Quaternion[0];
    // Lag compensation
    float currentTime = 0;
    double currentPacketTime = 0;
    double lastPacketTime = 0;
    Vector3 positionAtLastPacket = Vector3.zero;
    Quaternion rotationAtLastPacket = Quaternion.identity;
    Vector3 velocityAtLastPacket = Vector3.zero;
    Vector3 angularVelocityAtLastPacket = Vector3.zero;

    // Use this for initialization
    void Awake()
    {
        r = GetComponent<Rigidbody>();
        r.isKinematic = !photonView.IsMine;
        for (int i = 0; i < localScripts.Length; i++)
        {
            localScripts[i].enabled = photonView.IsMine;
        }
        for (int i = 0; i < localObjects.Length; i++)
        {
            localObjects[i].SetActive(photonView.IsMine);
        }
    }

    public void OnPhotonSerializeView(PhotonStream stream, PhotonMessageInfo info)
    {
        if (stream.IsWriting)
        {
            // We own this player: send the others our data
            stream.SendNext(transform.position);
            stream.SendNext(transform.rotation);
            stream.SendNext(r.velocity);
            stream.SendNext(r.angularVelocity);

            wheelRotations = new Quaternion[wheels.Length];
            for(int i = 0; i < wheels.Length; i++)
            {
                wheelRotations[i] = wheels[i].localRotation;
            }
            stream.SendNext(wheelRotations);
        }
        else
        {
            // Network player, receive data
            latestPos = (Vector3)stream.ReceiveNext();
            latestRot = (Quaternion)stream.ReceiveNext();
            latestVelocity = (Vector3)stream.ReceiveNext();
            latestAngularVelocity = (Vector3)stream.ReceiveNext();
            wheelRotations = (Quaternion[])stream.ReceiveNext();

            // Lag compensation
            currentTime = 0.0f;
            lastPacketTime = currentPacketTime;
            currentPacketTime = info.SentServerTime;
            positionAtLastPacket = transform.position;
            rotationAtLastPacket = transform.rotation;
            velocityAtLastPacket = r.velocity;
            angularVelocityAtLastPacket = r.angularVelocity;
        }
    }

    // Update is called once per frame
    void Update()
    {
        if (!photonView.IsMine)
        {
            // Lag compensation
            double timeToReachGoal = currentPacketTime - lastPacketTime;
            currentTime += Time.deltaTime;

            // Update car position and velocity
            transform.position = Vector3.Lerp(positionAtLastPacket, latestPos, (float)(currentTime / timeToReachGoal));
            transform.rotation = Quaternion.Lerp(rotationAtLastPacket, latestRot, (float)(currentTime / timeToReachGoal));
            r.velocity = Vector3.Lerp(velocityAtLastPacket, latestVelocity, (float)(currentTime / timeToReachGoal));
            r.angularVelocity = Vector3.Lerp(angularVelocityAtLastPacket, latestAngularVelocity, (float)(currentTime / timeToReachGoal));

            //Apply wheel rotation
            if(wheelRotations.Length == wheels.Length)
            {
                for (int i = 0; i < wheelRotations.Length; i++)
                {
                    wheels[i].localRotation = Quaternion.Lerp(wheels[i].localRotation, wheelRotations[i], Time.deltaTime * 6.5f);
                }
            }
        }
    }
}- "CarRoot" 개체에 PUN2_CarSync 스크립트를 연결합니다.
- PhotonView 구성요소를 "CarRoot" 객체에 연결
- PUN2_CarSync에서 SC_CarController 스크립트를 Local Scripts 배열에 할당합니다.
- PUN2_CarSync에서 카메라를 로컬 개체 배열에 할당합니다.
- WheelTransform 객체를 Wheels 배열에 할당
- 마지막으로 PUN2_CarSync 스크립트를 Photon View의 Observed Components 배열에 할당합니다.
- "CarRoot" 개체를 Prefab에 저장하고 Resources라는 폴더에 넣습니다(네트워크를 통해 개체를 생성하려면 필요함).
3. 게임 레벨 생성
게임 레벨은 Room에 참여한 후 로드되는 장면으로, 모든 작업이 발생합니다.
- 새 장면을 만들고 이름을 "Playground"로 지정합니다(또는 다른 이름을 유지하려면 PUN2_GameLobby.cs의 PhotonNetwork.LoadLevel("Playground") 줄에서 이름을 변경해야 합니다).
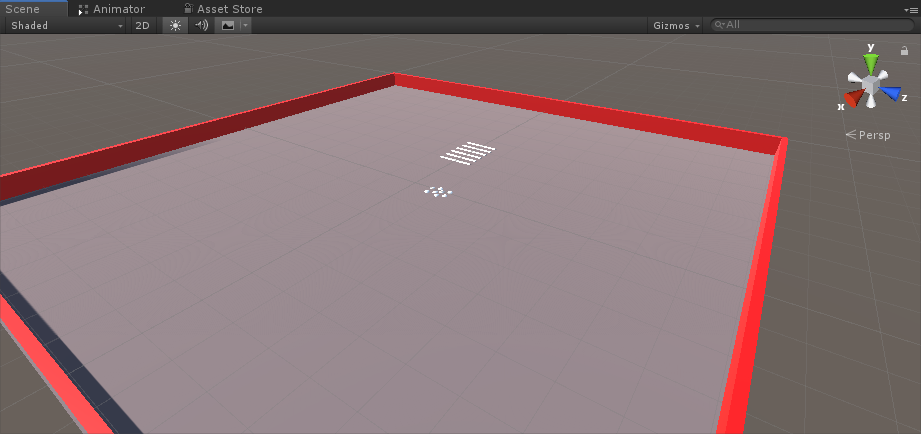
내 경우에는 평면과 일부 큐브가 포함된 간단한 장면을 사용하겠습니다.
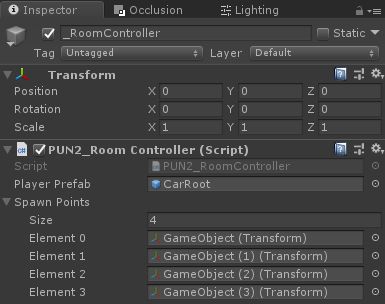
- 새 스크립트를 생성하고 이름을 PUN2_RoomController로 지정합니다(이 스크립트는 플레이어 생성, 플레이어 목록 표시 등과 같은 Room 내부 로직을 처리합니다). 그 안에 아래 코드를 붙여넣습니다.
PUN2_RoomController.cs
using UnityEngine;
using Photon.Pun;

public class PUN2_RoomController : MonoBehaviourPunCallbacks
{

    //Player instance prefab, must be located in the Resources folder
    public GameObject playerPrefab;
    //Player spawn point
    public Transform[] spawnPoints;

    // Use this for initialization
    void Start()
    {
        //In case we started this demo with the wrong scene being active, simply load the menu scene
        if (PhotonNetwork.CurrentRoom == null)
        {
            Debug.Log("Is not in the room, returning back to Lobby");
            UnityEngine.SceneManagement.SceneManager.LoadScene("GameLobby");
            return;
        }

        //We're in a room. spawn a character for the local player. it gets synced by using PhotonNetwork.Instantiate
        PhotonNetwork.Instantiate(playerPrefab.name, spawnPoints[Random.Range(0, spawnPoints.Length - 1)].position, spawnPoints[Random.Range(0, spawnPoints.Length - 1)].rotation, 0);
    }

    void OnGUI()
    {
        if (PhotonNetwork.CurrentRoom == null)
            return;

        //Leave this Room
        if (GUI.Button(new Rect(5, 5, 125, 25), "Leave Room"))
        {
            PhotonNetwork.LeaveRoom();
        }

        //Show the Room name
        GUI.Label(new Rect(135, 5, 200, 25), PhotonNetwork.CurrentRoom.Name);

        //Show the list of the players connected to this Room
        for (int i = 0; i < PhotonNetwork.PlayerList.Length; i++)
        {
            //Show if this player is a Master Client. There can only be one Master Client per Room so use this to define the authoritative logic etc.)
            string isMasterClient = (PhotonNetwork.PlayerList[i].IsMasterClient ? ": MasterClient" : "");
            GUI.Label(new Rect(5, 35 + 30 * i, 200, 25), PhotonNetwork.PlayerList[i].NickName + isMasterClient);
        }
    }

    public override void OnLeftRoom()
    {
        //We have left the Room, return back to the GameLobby
        UnityEngine.SceneManagement.SceneManager.LoadScene("GameLobby");
    }
}- "Playground" 장면에 새 GameObject를 생성하고 호출합니다. "_RoomController"
- _RoomController 개체에 PUN2_RoomController 스크립트를 연결합니다.
- 자동차 프리팹과 SpawnPoint를 할당한 다음 장면을 저장합니다.
- GameLobby 및 Playground 장면을 모두 빌드 설정에 추가합니다.

4. 테스트 빌드 만들기
이제 빌드하고 테스트할 차례입니다.
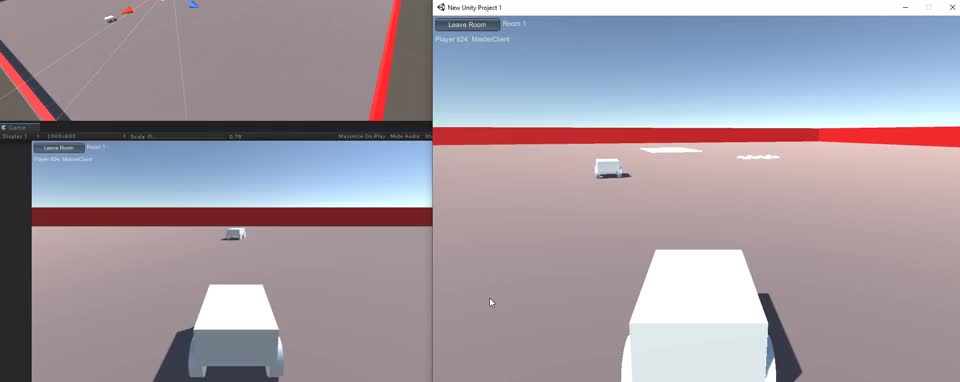
모든 것이 예상대로 작동합니다!