Unity용 3D 웜 컨트롤러 튜토리얼
이 튜토리얼에서는 TornadoTwins 초보자 게임 개발 튜토리얼 시리즈에서 영감을 받아 Unity에서 간단한 웜 컨트롤러를 만드는 방법을 보여 드리겠습니다.
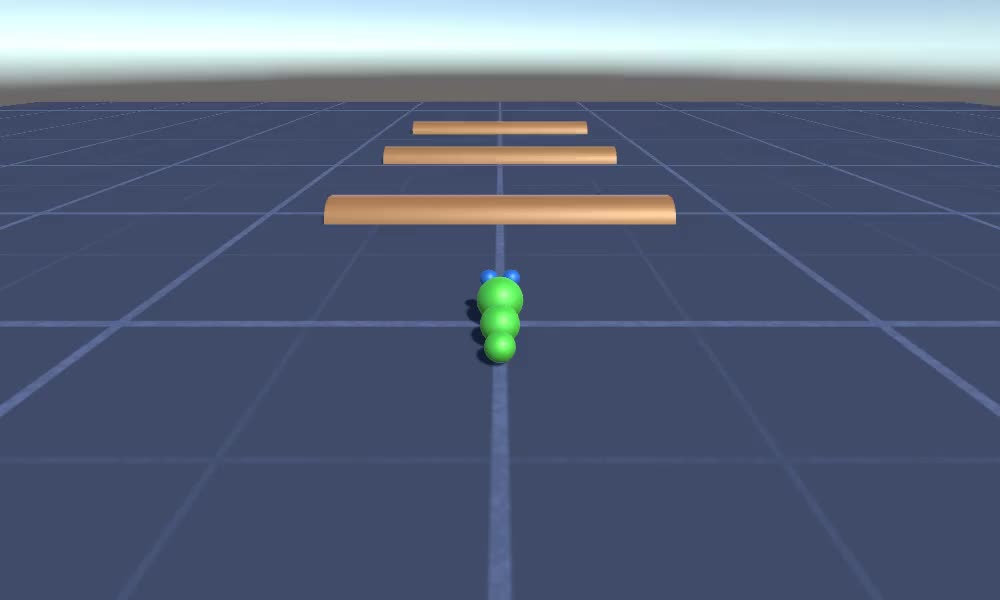
웜 컨트롤러는 부드러운 꼬리 따라가기 효과로 미끄러지듯 움직이며 점프할 수 있습니다.
이 튜토리얼의 스크립트는 원래 더 이상 지원되지 않는 JavaScript(UnityScript라고도 함)로 작성되었으므로 C# 대안을 제공하겠습니다.
Unity에 웜 컨트롤러를 생성하려면 다음이 필요합니다.
- 필요한 스크립트 만들기
- 벌레 캐릭터 생성
- 캐릭터에 스크립트 할당
1단계: 필요한 모든 스크립트 만들기
웜 컨트롤러를 설정하는 데 필요한 모든 스크립트를 작성하는 것부터 시작해 보겠습니다.
- 새 스크립트를 만들고 이름을 "SC_WormController"으로 지정한 후 그 안에 아래 코드를 붙여넣습니다.
SC_WormController.cs
using System.Collections;
using System.Collections.Generic;
using UnityEngine;

[RequireComponent(typeof(CharacterController))]
public class SC_WormController : MonoBehaviour
{
    public float speed = 3.0f;
    public float rotateSpeed = 1.0f;
    public float jumpSpeed = 5.0f;
    public float gravity = 9.8f;

    CharacterController controller;
    Vector3 moveDirection;

    // Start is called before the first frame update
    void Start()
    {
        controller = GetComponent<CharacterController>();
    }

    // Update is called once per frame
    void Update()
    {
        // Rotate around y - axis
        transform.Rotate(0, Input.GetAxis("Horizontal") * rotateSpeed, 0);

        // Move forward / backward
        Vector3 forward = transform.TransformDirection(Vector3.forward);
        float curSpeed = speed * Input.GetAxis("Vertical");
        float movementDirectionY = moveDirection.y;
        moveDirection = forward * curSpeed;

        // Jumping
        if (Input.GetButtonDown("Jump") && controller.isGrounded)
        {
            moveDirection.y = jumpSpeed;
        }
        else
        {
            moveDirection.y = movementDirectionY;
        }

        // Apply gravity. Gravity is multiplied by deltaTime twice (once here, and once below
        // when the moveDirection is multiplied by deltaTime). This is because gravity should be applied
        // as an acceleration (ms^-2)
        if (!controller.isGrounded)
        {
            moveDirection.y -= gravity * Time.deltaTime;
        }

        // Move the controller
        controller.Move(moveDirection * Time.deltaTime);
    }
}- 새 스크립트를 만들고 이름을 "SC_CameraFollow"으로 지정하고 그 안에 아래 코드를 붙여넣습니다.
SC_CameraFollow.cs
using System.Collections;
using System.Collections.Generic;
using UnityEngine;

public class SC_CameraFollow : MonoBehaviour
{
    /*
    This camera smoothers out rotation around the y-axis and height.
    Horizontal Distance to the target is always fixed.

    There are many different ways to smooth the rotation but doing it this way gives you a lot of control over how the camera behaves.

    For every of those smoothed values we calculate the wanted value and the current value.
    Then we smooth it using the Lerp function.
    Then we apply the smoothed values to the transform's position.
    */

    // The target we are following
    public Transform target;
    // The distance in the x-z plane to the target
    public float distance = 10.0f;
    // the height we want the camera to be above the target
    public float height = 5.0f;
    // How much we
    public float heightDamping = 2.0f;
    public float rotationDamping = 3.0f;

    void LateUpdate()
    {
        // Early out if we don't have a target
        if (!target)
            return;

        // Calculate the current rotation angles
        float wantedRotationAngle = target.eulerAngles.y;
        float wantedHeight = target.position.y + height;
        float currentRotationAngle = transform.eulerAngles.y;
        float currentHeight = transform.position.y;

        // Damp the rotation around the y-axis
        currentRotationAngle = Mathf.LerpAngle(currentRotationAngle, wantedRotationAngle, rotationDamping * Time.deltaTime);

        // Damp the height
        currentHeight = Mathf.Lerp(currentHeight, wantedHeight, heightDamping * Time.deltaTime);

        // Convert the angle into a rotation
        Quaternion currentRotation = Quaternion.Euler(0, currentRotationAngle, 0);

        // Set the position of the camera on the x-z plane to:
        // distance meters behind the target
        transform.position = target.position;
        transform.position -= currentRotation * Vector3.forward * distance;

        // Set the height of the camera
        transform.position = new Vector3(transform.position.x, currentHeight, transform.position.z);

        // Always look at the target
        transform.LookAt(target);
    }
}- 새 스크립트를 만들고 이름을 "SC_SmoothFollow"로 지정하고 그 안에 아래 코드를 붙여넣습니다.
SC_SmoothFollow.cs
using System.Collections;
using System.Collections.Generic;
using UnityEngine;

public class SC_SmoothFollow : MonoBehaviour
{
    // The target we are following
    public Transform target;
    // The distance in the x-z plane to the target
    public float distance = 10.0f;
    // the height we want the camera to be above the target
    public float height = 5.0f;
    // How much we
    public float heightDamping = 2.0f;
    public float rotationDamping = 3.0f;

    // Start is called before the first frame update
    void Start()
    {
        if (!target) return;

        transform.LookAt(target);
    }

    void LateUpdate()
    {
        // Early out if we don't have a target
        if (!target) return;

        // Calculate the current rotation angles
        float wantedRotationAngle = target.eulerAngles.y;
        float wantedHeight = target.position.y + height;

        float currentRotationAngle = transform.eulerAngles.y;
        float currentHeight = transform.position.y;

        // Damp the rotation around the y-axis
        currentRotationAngle = Mathf.LerpAngle(currentRotationAngle, wantedRotationAngle, rotationDamping * Time.deltaTime);

        // Damp the height
        currentHeight = Mathf.Lerp(currentHeight, wantedHeight, heightDamping * Time.deltaTime);

        // Convert the angle into a rotation
        var currentRotation = Quaternion.Euler(0, currentRotationAngle, 0);

        // Set the position of the camera on the x-z plane to:
        // distance meters behind the target
        transform.position = target.position;
        transform.position -= currentRotation * Vector3.forward * distance;

        // Set the height of the camera
        transform.position = new Vector3(transform.position.x, currentHeight, transform.position.z);

        // Always look at the target
        transform.LookAt(target);
    }
}
2단계: 웜 캐릭터 생성
다음 단계는 웜 캐릭터를 만드는 것입니다.
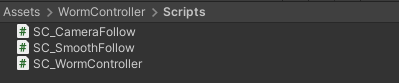
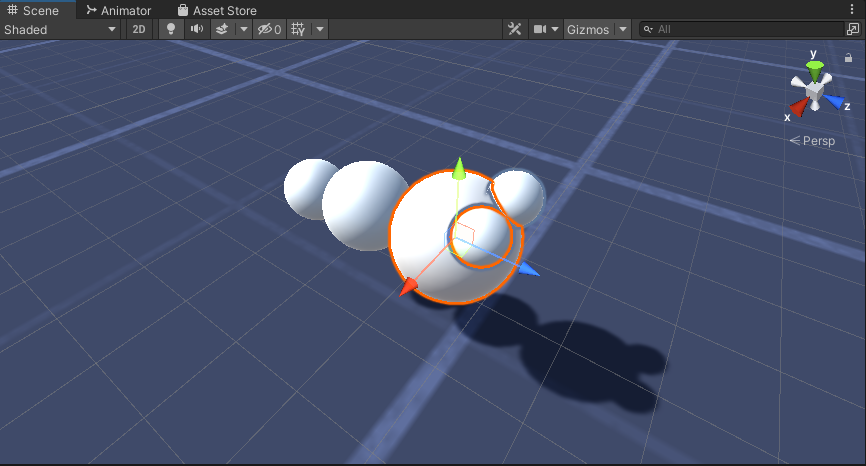
- 새 Sphere를 생성하고(GameObject -> 3D Object -> Sphere) 위치를 (0, 0, 0)으로 변경하고 SphereCollider 구성 요소를 삭제한 다음 이름을 다음으로 바꿉니다. "Worm"
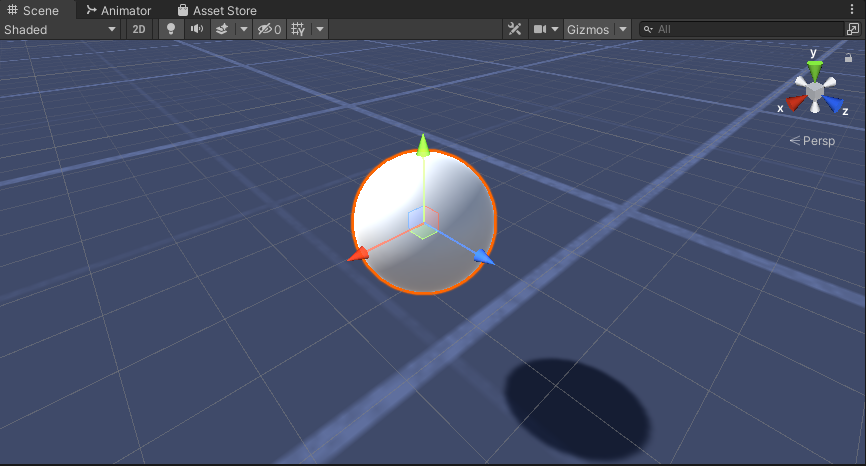
- "Worm" 구를 복제하고 이름을 "BodyPart1"로 바꾸고 위치를 (0, -0.1, -0.9)로 변경하고 배율을 (0.8, 0.8, 0.8)로 변경합니다.
- "Worm" 구를 다시 복제하고 이름을 "BodyPart2"로 바꾸고 위치를 (0, -0.2, -1.6)으로 변경하고 배율을 (0.6, 0.6, 0.6)으로 변경합니다.
- "Worm" 개체를 마우스 오른쪽 버튼으로 클릭 -> 빈 만들기를 클릭하고 새로 생성된 개체의 이름을 다음으로 바꿉니다. "Eyes"
- "BodyPart2" 구를 복제하고 이름을 "Eye"로 바꾸고 "Eyes" 개체 내부로 이동한 다음 위치를 (-0.24, 0.353, 0.324)로 변경하고 배율을 (0.4, 0.4, 0.4)로 변경합니다.
- "Eye" 구를 복제하고 X 위치를 0.24로 변경합니다.
- 시각화를 위해 몸에는 녹색, 눈에는 파란색 등 몇 가지 재질을 만들 수 있습니다.
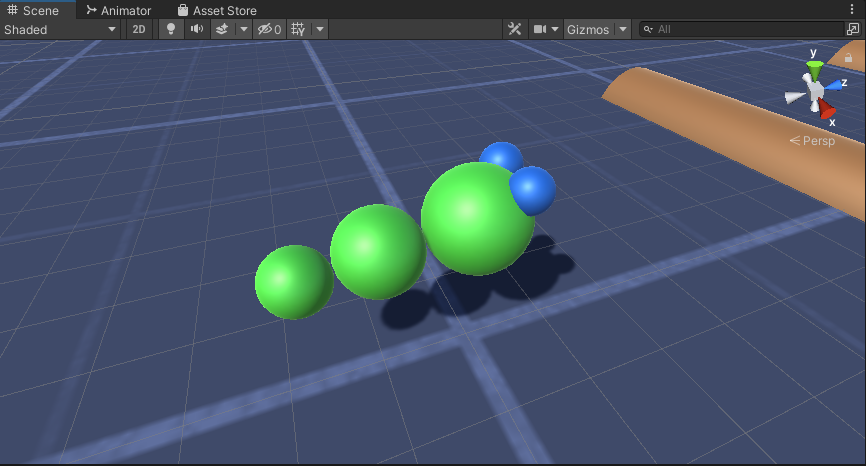
웜 캐릭터가 준비되었습니다.
3단계: 웜 컨트롤러 설정
마지막 단계는 스크립트를 할당하는 것입니다.
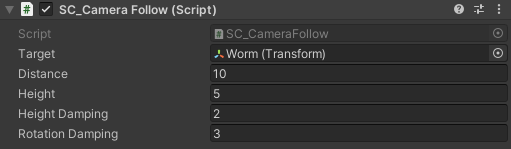
- SC_CameraFollow 스크립트를 주 카메라 개체에 연결하고 대상 변수에 "Worm" 구를 할당합니다.
- SC_WormController 스크립트를 "Worm" 구체에 연결합니다(CharacterController라는 또 다른 구성 요소가 자동으로 추가됩니다):

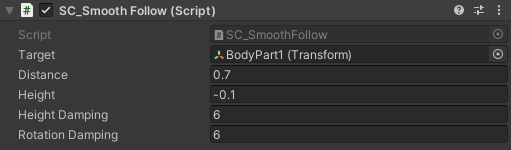
- SC_SmoothFollow 스크립트를 "BodyPart1" 구에 연결하고 해당 값을 아래 스크린샷와 동일하게 설정합니다.
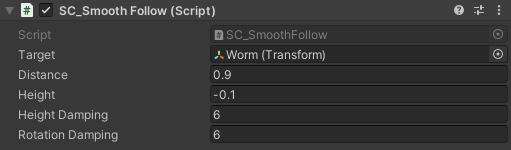
- SC_SmoothFollow 스크립트를 "BodyPart2" 구에 연결하고 해당 값을 아래 스크린샷와 동일하게 설정합니다.
이제 컨트롤러가 준비되었습니다. W, A, S, D를 사용하여 이동하고 Space를 사용하여 점프하세요.
소스 Unity 패키지는 아래에서 사용할 수 있습니다.