Unity의 카메라에 머리 흔들기 효과 추가
머리 흔들기 효과는 1인칭 슈팅 게임에서 널리 사용되며 플레이어의 몰입도를 높이는 데 중요한 역할을 합니다.
이 튜토리얼에서는 Unity에서 머리가 흔들리는 효과를 만드는 방법을 보여 드리겠습니다.
1단계: 플레이어 컨트롤러 설정
먼저 플레이어 컨트롤러를 만들어야 합니다.
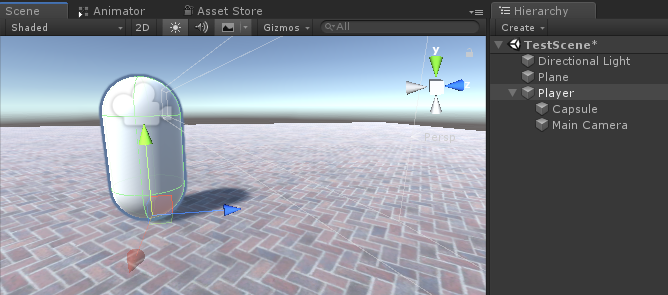
- 새 게임 개체를 만들고(Game Object -> Create Blank) 이름을 지정합니다. "Player"
- 새 캡슐(게임 개체 -> 3D 개체 -> 캡슐)을 만들고 "Player" 개체 내부로 옮깁니다.
- Capsule에서 Capsule Collider 구성 요소를 제거하고 위치를 (0, 1, 0)으로 변경합니다.
- Main Camera를 "Player" Object 내부로 이동하고 위치를 (0, 1.64, 0)으로 변경합니다.
- 새 스크립트를 만들고 이름을 "SC_CharacterController"로 지정한 후 그 안에 아래 코드를 붙여넣습니다.
SC_CharacterController.cs
using UnityEngine;

[RequireComponent(typeof(CharacterController))]

public class SC_CharacterController : MonoBehaviour
{
    public float speed = 7.5f;
    public float jumpSpeed = 8.0f;
    public float gravity = 20.0f;
    public Camera playerCamera;
    public float lookSpeed = 2.0f;
    public float lookXLimit = 45.0f;

    CharacterController characterController;
    [HideInInspector]
    public Vector3 moveDirection = Vector3.zero;
    Vector2 rotation = Vector2.zero;

    [HideInInspector]
    public bool canMove = true;

    void Start()
    {
        characterController = GetComponent<CharacterController>();
        rotation.y = transform.eulerAngles.y;
    }

    void Update()
    {
        if (characterController.isGrounded)
        {
            // We are grounded, so recalculate move direction based on axes
            Vector3 forward = transform.TransformDirection(Vector3.forward);
            Vector3 right = transform.TransformDirection(Vector3.right);
            float curSpeedX = canMove ? speed * Input.GetAxis("Vertical") : 0;
            float curSpeedY = canMove ? speed * Input.GetAxis("Horizontal") : 0;
            moveDirection = (forward * curSpeedX) + (right * curSpeedY);

            if (Input.GetButton("Jump") && canMove)
            {
                moveDirection.y = jumpSpeed;
            }
        }

        // Apply gravity. Gravity is multiplied by deltaTime twice (once here, and once below
        // when the moveDirection is multiplied by deltaTime). This is because gravity should be applied
        // as an acceleration (ms^-2)
        moveDirection.y -= gravity * Time.deltaTime;

        // Move the controller
        characterController.Move(moveDirection * Time.deltaTime);

        // Player and Camera rotation
        if (canMove)
        {
            rotation.y += Input.GetAxis("Mouse X") * lookSpeed;
            rotation.x += -Input.GetAxis("Mouse Y") * lookSpeed;
            rotation.x = Mathf.Clamp(rotation.x, -lookXLimit, lookXLimit);
            playerCamera.transform.localRotation = Quaternion.Euler(rotation.x, 0, 0);
            transform.eulerAngles = new Vector2(0, rotation.y);
        }
    }
}- SC_CharacterController 스크립트를 "Player" 개체에 연결합니다. (Character Controller라는 또 다른 구성 요소도 추가되었음을 알 수 있습니다. 중심 값을 (0, 1, 0)으로 변경합니다.)
- SC_CharacterController의 플레이어 카메라 변수에 기본 카메라를 할당합니다.
이제 플레이어 컨트롤러가 준비되었습니다.
2단계: 머리 흔들림 효과 추가
Head Bobbing Effect는 스크립트의 도움으로 이루어지며 플레이어가 움직일 때 카메라를 위아래로 움직여 작동합니다.
- 새 스크립트를 생성하고 이름을 SC_HeadBobber로 지정한 후 그 안에 아래 코드를 붙여넣습니다.
SC_HeadBobber.cs
using UnityEngine;

public class SC_HeadBobber : MonoBehaviour
{
    public float walkingBobbingSpeed = 14f;
    public float bobbingAmount = 0.05f;
    public SC_CharacterController controller;

    float defaultPosY = 0;
    float timer = 0;

    // Start is called before the first frame update
    void Start()
    {
        defaultPosY = transform.localPosition.y;
    }

    // Update is called once per frame
    void Update()
    {
        if(Mathf.Abs(controller.moveDirection.x) > 0.1f || Mathf.Abs(controller.moveDirection.z) > 0.1f)
        {
            //Player is moving
            timer += Time.deltaTime * walkingBobbingSpeed;
            transform.localPosition = new Vector3(transform.localPosition.x, defaultPosY + Mathf.Sin(timer) * bobbingAmount, transform.localPosition.z);
        }
        else
        {
            //Idle
            timer = 0;
            transform.localPosition = new Vector3(transform.localPosition.x, Mathf.Lerp(transform.localPosition.y, defaultPosY, Time.deltaTime * walkingBobbingSpeed), transform.localPosition.z);
        }
    }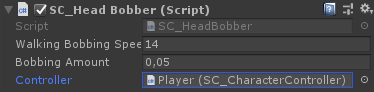
}- SC_HeadBobber 스크립트를 기본 카메라에 연결
- SC_CharacterController 스크립트를 "Controller" 변수에 할당
마지막으로 Play를 눌러 테스트해 보세요. 플레이어가 움직일 때 카메라 흔들림이 활성화되어야 합니다.