Unity 모바일 터치 컨트롤을 만드는 방법
컨트롤은 비디오 게임의 가장 중요한 부분 중 하나이며 플레이어가 게임 세계와 상호 작용할 수 있게 해주는 요소입니다.
게임 컨트롤은 하드웨어 상호 작용(마우스/키보드, 컨트롤러, 터치스크린 등)을 통해 전송된 신호를 게임 코드로 처리하여 특정 작업을 적용하는 것입니다.
PC 및 게임 콘솔에는 누를 수 있는 물리적 버튼이 있지만 최신 모바일 장치에는 몇 개의 물리적 버튼만 있고 나머지 상호 작용은 터치 제스처를 통해 수행됩니다. 이는 게임 버튼이 화면에 표시되어야 함을 의미합니다. 그렇기 때문에 모바일 게임을 만들 때 화면에 모든 버튼을 표시하는 동시에 사용자 친화적이고 깔끔하게 유지하는 것 사이의 균형을 찾는 것이 중요합니다.

이 튜토리얼에서는 UI 캔버스를 사용하여 Unity에서 모든 기능을 갖춘(조이스틱 및 버튼) 모바일 컨트롤을 만드는 방법을 보여 드리겠습니다.
1단계: 필요한 모든 스크립트 만들기
이 튜토리얼에는 SC_ClickTracker.cs 및 SC_MobileControls.cs라는 2개의 스크립트가 포함되어 있습니다. 첫 번째 스크립트는 클릭 이벤트를 수신하고 두 번째 스크립트는 이벤트에서 생성된 값을 읽습니다.
SC_ClickTracker.cs
using System.Collections;
using System.Collections.Generic;
using UnityEngine;
using UnityEngine.EventSystems;
#if UNITY_EDITOR
using UnityEditor;
#endif
public class SC_ClickTracker : MonoBehaviour, IPointerDownHandler, IDragHandler, IPointerUpHandler
{
public string buttonName = ""; //This should be an unique name of the button
public bool isJoystick = false;
public float movementLimit = 1; //How far the joystick can be moved (n x Joystick Width)
public float movementThreshold = 0.1f; //Minimum distance (n x Joystick Width) that the Joystick need to be moved to trigger inputAxis (Must be less than movementLimit)
//Reference variables
RectTransform rt;
Vector3 startPos;
Vector2 clickPos;
//Input variables
Vector2 inputAxis = Vector2.zero;
bool holding = false;
bool clicked = false;
void Start()
{
//Add this button to the list
SC_MobileControls.instance.AddButton(this);
rt = GetComponent<RectTransform>();
startPos = rt.anchoredPosition3D;
}
//Do this when the mouse is clicked over the selectable object this script is attached to.
public void OnPointerDown(PointerEventData eventData)
{
//Debug.Log(this.gameObject.name + " Was Clicked.");
holding = true;
if (!isJoystick)
{
clicked = true;
StartCoroutine(StopClickEvent());
}
else
{
//Initialize Joystick movement
clickPos = eventData.pressPosition;
}
}
WaitForEndOfFrame waitForEndOfFrame = new WaitForEndOfFrame();
//Wait for next update then release the click event
IEnumerator StopClickEvent()
{
yield return waitForEndOfFrame;
clicked = false;
}
//Joystick movement
public void OnDrag(PointerEventData eventData)
{
//Debug.Log(this.gameObject.name + " The element is being dragged");
if (isJoystick)
{
Vector3 movementVector = Vector3.ClampMagnitude((eventData.position - clickPos) / SC_MobileControls.instance.canvas.scaleFactor, (rt.sizeDelta.x * movementLimit) + (rt.sizeDelta.x * movementThreshold));
Vector3 movePos = startPos + movementVector;
rt.anchoredPosition = movePos;
//Update inputAxis
float inputX = 0;
float inputY = 0;
if (Mathf.Abs(movementVector.x) > rt.sizeDelta.x * movementThreshold)
{
inputX = (movementVector.x - (rt.sizeDelta.x * movementThreshold * (movementVector.x > 0 ? 1 : -1))) / (rt.sizeDelta.x * movementLimit);
}
if (Mathf.Abs(movementVector.y) > rt.sizeDelta.x * movementThreshold)
{
inputY = (movementVector.y - (rt.sizeDelta.x * movementThreshold * (movementVector.y > 0 ? 1 : -1))) / (rt.sizeDelta.x * movementLimit);
}
inputAxis = new Vector2(inputX, inputY);
}
}
//Do this when the mouse click on this selectable UI object is released.
public void OnPointerUp(PointerEventData eventData)
{
//Debug.Log(this.gameObject.name + " The mouse click was released");
holding = false;
if (isJoystick)
{
//Reset Joystick position
rt.anchoredPosition = startPos;
inputAxis = Vector2.zero;
}
}
public Vector2 GetInputAxis()
{
return inputAxis;
}
public bool GetClickedStatus()
{
return clicked;
}
public bool GetHoldStatus()
{
return holding;
}
}
#if UNITY_EDITOR
//Custom Editor
[CustomEditor(typeof(SC_ClickTracker))]
public class SC_ClickTracker_Editor : Editor
{
public override void OnInspectorGUI()
{
SC_ClickTracker script = (SC_ClickTracker)target;
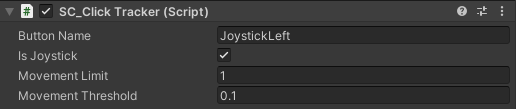
script.buttonName = EditorGUILayout.TextField("Button Name", script.buttonName);
script.isJoystick = EditorGUILayout.Toggle("Is Joystick", script.isJoystick);
if (script.isJoystick)
{
script.movementLimit = EditorGUILayout.FloatField("Movement Limit", script.movementLimit);
script.movementThreshold = EditorGUILayout.FloatField("Movement Threshold", script.movementThreshold);
}
}
}
#endifSC_MobileControls.cs
using System.Collections;
using System.Collections.Generic;
using UnityEngine;

public class SC_MobileControls : MonoBehaviour
{
    [HideInInspector]
    public Canvas canvas;
    List<SC_ClickTracker> buttons = new List<SC_ClickTracker>();

    public static SC_MobileControls instance;

    void Awake()
    {
        //Assign this script to static variable, so it can be accessed from other scripts. Make sure there is only one SC_MobileControls in the Scene.
        instance = this;

        canvas = GetComponent<Canvas>();
    }

    public int AddButton(SC_ClickTracker button)
    {
        buttons.Add(button);

        return buttons.Count - 1;
    }

    public Vector2 GetJoystick(string joystickName)
    {
        for(int i = 0; i < buttons.Count; i++)
        {
            if(buttons[i].buttonName == joystickName)
            {
                return buttons[i].GetInputAxis();
            }
        }

        Debug.LogError("Joystick with a name '" + joystickName + "' not found. Make sure SC_ClickTracker is assigned to the button and the name is matching.");

        return Vector2.zero;
    }

    public bool GetMobileButton(string buttonName)
    {
        for (int i = 0; i < buttons.Count; i++)
        {
            if (buttons[i].buttonName == buttonName)
            {
                return buttons[i].GetHoldStatus();
            }
        }

        Debug.LogError("Button with a name '" + buttonName + "' not found. Make sure SC_ClickTracker is assigned to the button and the name is matching.");

        return false;
    }

    public bool GetMobileButtonDown(string buttonName)
    {
        for (int i = 0; i < buttons.Count; i++)
        {
            if (buttons[i].buttonName == buttonName)
            {
                return buttons[i].GetClickedStatus();
            }
        }

        Debug.LogError("Button with a name '" + buttonName + "' not found. Make sure SC_ClickTracker is assigned to the button and the name is matching.");

        return false;
    }
}
2단계: 모바일 컨트롤 설정
- 새 캔버스를 만듭니다(GameObject -> UI -> Canvas).
- Canvas Scaler의 'UI Scale Mode'을 'Scale With Screen Size'로 변경하고 참조 해상도를 작업 중인 해상도로 변경합니다(제 경우에는 1000 x 600입니다).
- SC_MobileControls 스크립트를 캔버스 개체에 연결
- 캔버스 개체 -> UI -> 이미지를 마우스 오른쪽 버튼으로 클릭합니다.
- 새로 생성된 이미지의 이름을 다음으로 바꿉니다. "JoystickLeft"
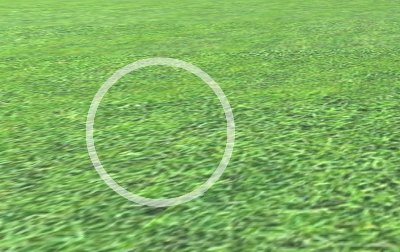
- "JoystickLeft" Sprite를 빈 원으로 변경합니다(텍스처 유형을 Unity로 가져온 후 'Sprite (2D and UI)'으로 변경하는 것을 잊지 마세요).

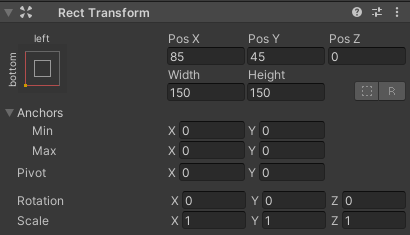
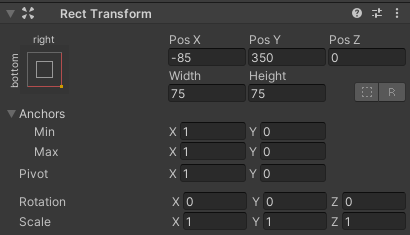
- "JoystickLeft" Rect Transform 값을 아래 스크린샷와 동일하게 설정합니다.
- 이미지 구성요소에서 색상 알파를 0.5로 설정하여 스프라이트를 약간 투명하게 만듭니다.
- "JoystickLeft" 개체를 복제하고 이름을 다음으로 바꿉니다. "JoystickLeftButton"
- "JoystickLeft" 개체 내부로 "JoystickLeftButton"을 이동합니다.
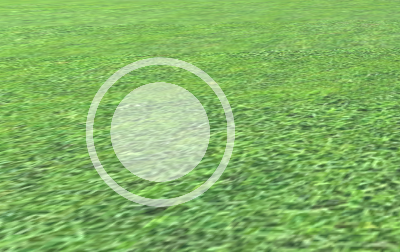
- "JoystickLeftButton" Sprite를 채워진 원으로 변경합니다.

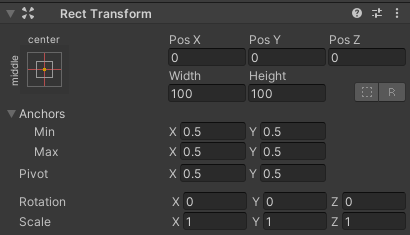
- "JoystickLeftButton" Rect Transform 값을 아래 스크린샷과 동일하게 설정합니다.
- Button 구성 요소를 추가합니다. "JoystickLeftButton"
- Button 구성 요소에서 Transition을 다음으로 변경합니다. 'None'
- SC_ClickTracker 스크립트를 첨부하세요. "JoystickLeftButton"
- SC_ClickTracker에서 버튼 이름을 고유한 이름으로 설정하고(제 경우에는 'JoystickLeft'로 설정했습니다) 'Is Joystick' 확인란을 활성화합니다.
조이스틱 버튼이 준비되었습니다. 조이스틱은 원하는 수만큼 가질 수 있습니다(제 경우에는 2개를 사용하겠습니다. 하나는 왼쪽에 이동을 제어하고 다른 하나는 오른쪽에 회전을 제어합니다).
- "JoystickLeft"를 복제하고 이름을 다음으로 바꿉니다. "JoystickRight"
- "JoystickRight"를 확장하고 "JoystickLeftButton"의 이름을 다음으로 바꿉니다. "JoystickRightButton"
- "JoystickRight" Rect Transform 값을 아래 스크린샷과 동일하게 설정합니다.

- "JoystickRightButton" 개체를 선택하고 SC_ClickTracker에서 버튼 이름을 다음으로 변경합니다. 'JoystickRight'
두 번째 조이스틱이 준비되었습니다.
이제 일반 버튼을 만들어 보겠습니다.
- 캔버스 개체 -> UI -> 버튼을 마우스 오른쪽 버튼으로 클릭합니다.
- 버튼 개체의 이름을 다음으로 바꿉니다. "SprintButton"
- "SprintButton" Sprite를 경사 효과가 있는 원으로 변경합니다.

- "SprintButton" Rect Transform 값을 아래 스크린샷과 동일하게 설정합니다.
- "SprintButton" 이미지 색상 알파를 0.5로 변경합니다.
- SC_ClickTracker 스크립트를 "SprintButton" 개체에 연결
- SC_ClickTracker에서 버튼 이름을 다음으로 변경합니다. 'Sprinting'
- "SprintButton" 내부의 텍스트 개체를 선택하고 해당 텍스트를 'Sprint'으로 변경하고 글꼴 크기도 다음으로 변경합니다. 'Bold'
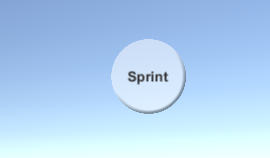
버튼이 준비되었습니다.
"Jump"이라는 또 다른 버튼을 만들겠습니다.
- "SprintButton" 개체를 복제하고 이름을 다음으로 바꿉니다. "JumpButton"
- "JumpButton" Pos Y 값을 250으로 변경합니다.
- SC_ClickTracker에서 버튼 이름을 다음으로 변경합니다. 'Jumping'
- "JumpButton" 안의 텍스트를 다음으로 변경하세요. 'Jump'
마지막 버튼은 "Action"입니다.
- "JumpButton" 개체를 복제하고 이름을 다음으로 바꿉니다. "ActionButton"
- "ActionButton" Pos X 값을 -185로 변경합니다.
- SC_ClickTracker에서 버튼 이름을 다음으로 변경합니다. 'Action'
- "ActionButton" 안의 텍스트를 다음으로 변경하세요. 'Action'
3단계: 모바일 컨트롤 구현
위 단계를 따랐다면 이제 다음 함수를 사용하여 스크립트에 모바일 컨트롤을 구현할 수 있습니다.
if(SC_MobileControls.instance.GetMobileButtonDown("BUTTON_NAME")){
	//Mobile button has been pressed one time, equivalent to if(Input.GetKeyDown(KeyCode...))
}

if(SC_MobileControls.instance.GetMobileButton("BUTTON_NAME")){
	//Mobile button is being held pressed, equivalent to if(Input.GetKey(KeyCode...))
}

//Get normalized direction of a on-screen Joystick
//Could be compared to: new Vector2(Input.GetAxis("Horizontal"), Input.GetAxis("Vertical")) or new Vector2(Input.GetAxis("Mouse X"), Input.GetAxis("Mouse Y"))
Vector2 inputAxis = SC_MobileControls.instance.GetJoystick("JOYSTICK_NAME");
예를 들어 이 튜토리얼의 FPS 컨트롤러를 사용하여 모바일 컨트롤을 구현하겠습니다. 먼저 해당 튜토리얼을 따르십시오. 매우 간단합니다.
해당 튜토리얼을 따랐다면 이제 모바일 컨트롤이 있는 Canvas와 함께 "FPSPlayer" 개체를 갖게 됩니다.
우리는 모바일 컨트롤을 구현하는 동시에 데스크톱 컨트롤을 유지하여 크로스 플랫폼으로 만들 것입니다.
- SC_FPSController 스크립트를 열고 28행까지 스크롤한 후 이 부분을 제거합니다. (해당 부분을 제거하면 커서가 잠기는 것을 방지하고 편집기에서 모바일 컨트롤을 클릭할 수 있습니다.)
        // Lock cursor
        Cursor.lockState = CursorLockMode.Locked;
Cursor.visible = false;- 39행까지 스크롤하여 다음을 바꿉니다.
        bool isRunning = Input.GetKey(KeyCode.LeftShift);
        float curSpeedX = canMove ? (isRunning ? runningSpeed : walkingSpeed) * Input.GetAxis("Vertical") : 0;
float curSpeedY = canMove ? (isRunning ? runningSpeed : walkingSpeed) * Input.GetAxis("Horizontal") : 0;- 와 함께:
        bool isRunning = Input.GetKey(KeyCode.LeftShift) || SC_MobileControls.instance.GetMobileButton("Sprinting");
        float curSpeedX = canMove ? (isRunning ? runningSpeed : walkingSpeed) * (Input.GetAxis("Vertical") + SC_MobileControls.instance.GetJoystick("JoystickLeft").y) : 0;
float curSpeedY = canMove ? (isRunning ? runningSpeed : walkingSpeed) * (Input.GetAxis("Horizontal") + SC_MobileControls.instance.GetJoystick("JoystickLeft").x) : 0;- 45행까지 아래로 스크롤하여 다음을 교체합니다.
if (Input.GetButton("Jump") && canMove && characterController.isGrounded)- 와 함께:
if ((Input.GetButton("Jump") || SC_MobileControls.instance.GetMobileButtonDown("Jumping")) && canMove && characterController.isGrounded)- 68행까지 아래로 스크롤하여 다음을 바꿉니다.
            rotationX += -Input.GetAxis("Mouse Y") * lookSpeed;
            rotationX = Mathf.Clamp(rotationX, -lookXLimit, lookXLimit);
            playerCamera.transform.localRotation = Quaternion.Euler(rotationX, 0, 0);
transform.rotation *= Quaternion.Euler(0, Input.GetAxis("Mouse X") * lookSpeed, 0);- 와 함께:
#if UNITY_IPHONE || UNITY_ANDROID || UNITY_EDITOR
            rotationX += -(SC_MobileControls.instance.GetJoystick("JoystickRight").y) * lookSpeed;
#else
            rotationX += -Input.GetAxis("Mouse Y") * lookSpeed;
#endif
            rotationX = Mathf.Clamp(rotationX, -lookXLimit, lookXLimit);
            playerCamera.transform.localRotation = Quaternion.Euler(rotationX, 0, 0);
#if UNITY_IPHONE || UNITY_ANDROID || UNITY_EDITOR
            transform.rotation *= Quaternion.Euler(0, SC_MobileControls.instance.GetJoystick("JoystickRight").x * lookSpeed, 0);
#else
            transform.rotation *= Quaternion.Euler(0, Input.GetAxis("Mouse X") * lookSpeed, 0);
#endif
보기 움직임이 에디터의 조이스틱 테스트를 방해하므로 플랫폼별 컴파일에 #if을 사용하여 모바일 로직을 나머지 플랫폼과 분리합니다.
이제 모바일 FPS 컨트롤러가 준비되었습니다. 테스트해 보겠습니다.
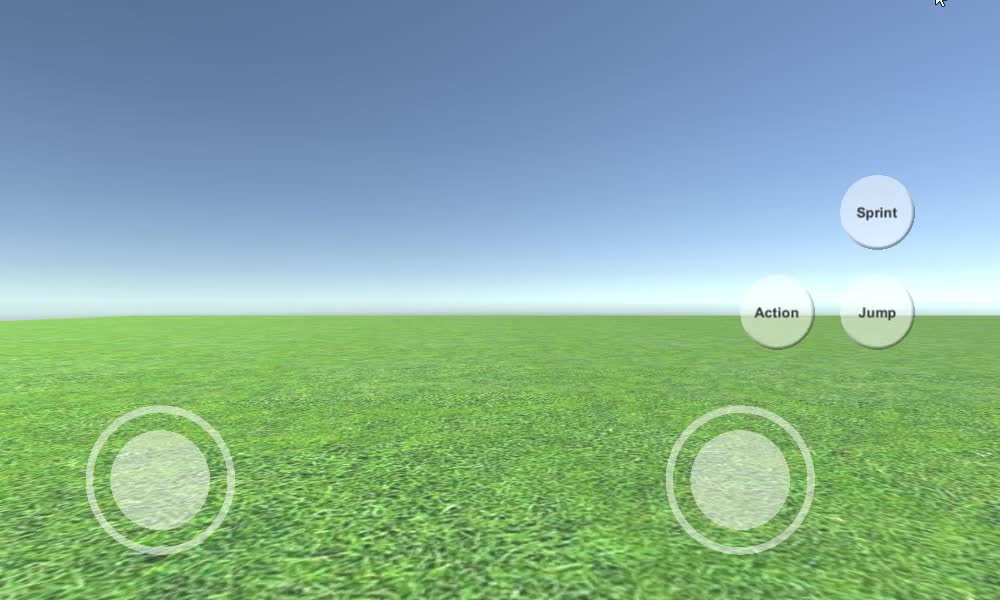
보시다시피 모든 조이스틱과 버튼은 작동합니다(적절한 기능이 없어 구현되지 않은 "Action" 버튼 제외).