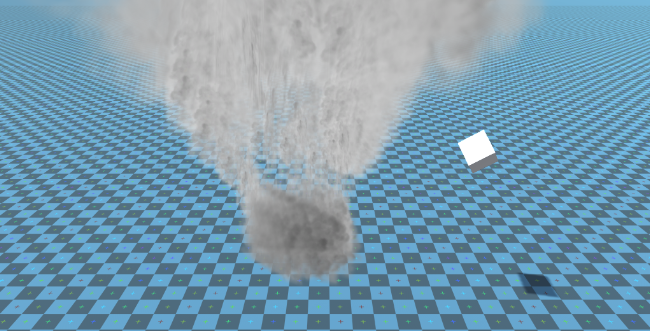
Unity에서 토네이도 물리학 만들기
이 튜토리얼에서는 Unity 내부에 토네이도 시뮬레이션을 생성하겠습니다.
Unity 이 튜토리얼에서 사용된 버전: Unity 2018.3.0f2(64비트)
1단계: 필요한 모든 스크립트 만들기
이 튜토리얼에는 2개의 스크립트가 필요합니다.
SC_Caught.cs
//This script is attached automatically to each Object caught in Tornado

using UnityEngine;

public class SC_Caught : MonoBehaviour
{
    private SC_Tornado tornadoReference;
    private SpringJoint spring;
    [HideInInspector]
    public Rigidbody rigid;

    // Use this for initialization
    void Start()
    {
        rigid = GetComponent<Rigidbody>();
    }

    // Update is called once per frame
    void Update()
    {
        //Lift spring so objects are pulled upwards
        Vector3 newPosition = spring.connectedAnchor;
        newPosition.y = transform.position.y;
        spring.connectedAnchor = newPosition;
    }

    void FixedUpdate()
    {
        //Rotate object around tornado center
        Vector3 direction = transform.position - tornadoReference.transform.position;
        //Project
        Vector3 projection = Vector3.ProjectOnPlane(direction, tornadoReference.GetRotationAxis());
        projection.Normalize();
        Vector3 normal = Quaternion.AngleAxis(130, tornadoReference.GetRotationAxis()) * projection;
        normal = Quaternion.AngleAxis(tornadoReference.lift, projection) * normal;
        rigid.AddForce(normal * tornadoReference.GetStrength(), ForceMode.Force);

        Debug.DrawRay(transform.position, normal * 10, Color.red);
    }

    //Call this when tornadoReference already exists
    public void Init(SC_Tornado tornadoRef, Rigidbody tornadoRigidbody, float springForce)
    {
        //Make sure this is enabled (for reentrance)
        enabled = true;

        //Save tornado reference
        tornadoReference = tornadoRef;

        //Initialize the spring
        spring = gameObject.AddComponent<SpringJoint>();
        spring.spring = springForce;
        spring.connectedBody = tornadoRigidbody;

        spring.autoConfigureConnectedAnchor = false;

        //Set initial position of the caught object relative to its position and the tornado
        Vector3 initialPosition = Vector3.zero;
        initialPosition.y = transform.position.y;
        spring.connectedAnchor = initialPosition;
    }

    public void Release()
    {
        enabled = false;
        Destroy(spring);
    }
}
SC_Tornado.cs
//Tornado script controls tornado physics

using System.Collections.Generic;
using UnityEngine;

public class SC_Tornado : MonoBehaviour
{
    [Tooltip("Distance after which the rotation physics starts")]
    public float maxDistance = 20;

    [Tooltip("The axis that the caught objects will rotate around")]
    public Vector3 rotationAxis = new Vector3(0, 1, 0);

    [Tooltip("Angle that is added to the object's velocity (higher lift -> quicker on top)")]
    [Range(0, 90)]
    public float lift = 45;

    [Tooltip("The force that will drive the caught objects around the tornado's center")]
    public float rotationStrength = 50;

    [Tooltip("Tornado pull force")]
    public float tornadoStrength = 2;

    Rigidbody r;

    List<SC_Caught> caughtObject = new List<SC_Caught>();

    // Start is called before the first frame update
    void Start()
    {
        //Normalize the rotation axis given by the user
        rotationAxis.Normalize();

        r = GetComponent<Rigidbody>();
        r.isKinematic = true;
    }

    void FixedUpdate()
    {
        //Apply force to caught objects
        for (int i = 0; i < caughtObject.Count; i++)
        {
            if(caughtObject[i] != null)
            {
                Vector3 pull = transform.position - caughtObject[i].transform.position;
                if (pull.magnitude > maxDistance)
                {
                    caughtObject[i].rigid.AddForce(pull.normalized * pull.magnitude, ForceMode.Force);
                    caughtObject[i].enabled = false;
                }
                else
                {
                    caughtObject[i].enabled = true;
                }
            }
        }
    }

    void OnTriggerEnter(Collider other)
    {
        if (!other.attachedRigidbody) return;
        if (other.attachedRigidbody.isKinematic) return;

        //Add caught object to the list
        SC_Caught caught = other.GetComponent<SC_Caught>();
        if (!caught)
        {
            caught = other.gameObject.AddComponent<SC_Caught>();
        }

        caught.Init(this, r, tornadoStrength);

        if (!caughtObject.Contains(caught))
        {
            caughtObject.Add(caught);
        }
    }

    void OnTriggerExit(Collider other)
    {
        //Release caught object
        SC_Caught caught = other.GetComponent<SC_Caught>();
        if (caught)
        {
            caught.Release();

            if (caughtObject.Contains(caught))
            {
                caughtObject.Remove(caught);
            }
        }
    }

    public float GetStrength()
    {
        return rotationStrength;
    }

    //The axis the caught objects rotate around
    public Vector3 GetRotationAxis()
    {
        return rotationAxis;
    }

    //Draw tornado radius circle in Editor
    void OnDrawGizmosSelected()
    {
        Vector3[] positions = new Vector3[30];
        Vector3 centrePos = transform.position;
        for (int pointNum = 0; pointNum < positions.Length; pointNum++)
        {
            // "i" now represents the progress around the circle from 0-1
            // we multiply by 1.0 to ensure we get a fraction as a result.
            float i = (float)(pointNum * 2) / positions.Length;

            // get the angle for this step (in radians, not degrees)
            float angle = i * Mathf.PI * 2;

            // the X & Y position for this angle are calculated using Sin & Cos
            float x = Mathf.Sin(angle) * maxDistance;
            float z = Mathf.Cos(angle) * maxDistance;

            Vector3 pos = new Vector3(x, 0, z) + centrePos;
            positions[pointNum] = pos;
        }

        Gizmos.color = Color.cyan;
        for (int i = 0; i < positions.Length; i++)
        {
            if (i == positions.Length - 1)
            {
                Gizmos.DrawLine(positions[0], positions[positions.Length - 1]);
            }
            else
            {
                Gizmos.DrawLine(positions[i], positions[i + 1]);
            }
        }
    }
}![]()
2단계: 토네이도 생성
1. 토네이도 입자 만들기:
- 새 GameObject를 생성하고(GameObject -> Create Blank) 이름을 지정합니다. "Tornado"
- 다른 GameObject를 만들고 이름을 "Particles"로 지정한 다음 "Tornado" 안으로 이동하고 위치를 (0, 0, 0)으로 변경합니다.
- "Particles" GameObject에 ParticleSystem 구성요소를 추가
- 파티클 시스템에서 다음 모듈을 활성화합니다: Emission, Shape, Velocity over Lifetime, Color over Lifetime, Size over Lifetime , 수명에 따른 회전, 외부 힘, 렌더러.
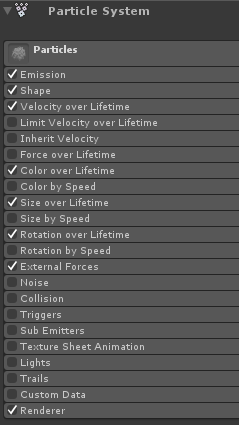
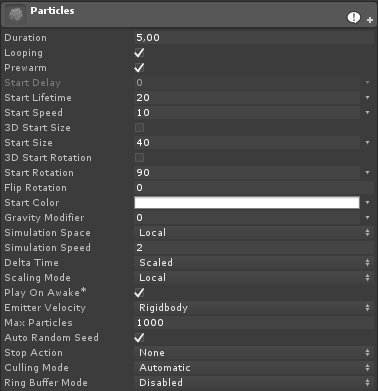
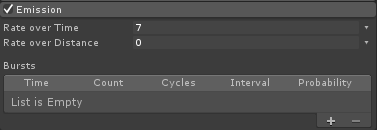
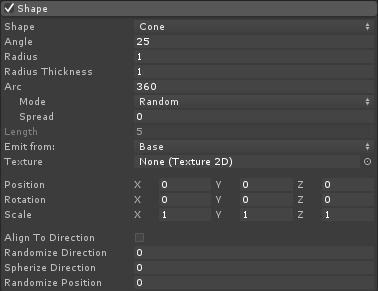
2. 각 파티클 시스템 모듈에 값을 할당합니다(아래 스크린샷 확인).
기본(입자) 모듈:
방출 모듈:
모양 모듈:
수명에 따른 속도 모듈:

평생 색상 모듈:
![]()
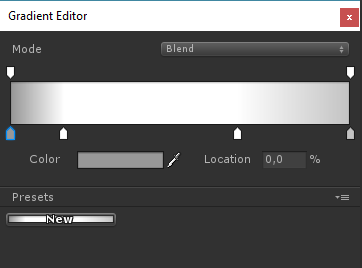
(양끝에 그레이 컬러 2개, 안쪽에 화이트 컬러 2개)
수명에 따른 크기 모듈:

(평생에 따른 크기는 다음과 같은 곡선을 사용합니다):
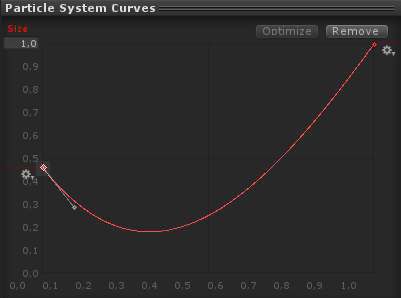
(크기가 약간 줄었다가 올라갑니다)
수명주기에 따른 순환:
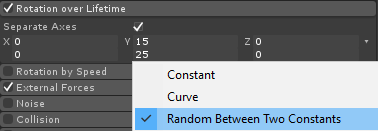
외부 힘 모듈:
이 모듈은 변경할 필요가 없으며 기본값을 그대로 둡니다.
렌더러 모듈:
이 모듈에서는 다음 자료만 할당하면 됩니다.
- 새로운 머티리얼을 생성하고 호출하세요. "tornado_material"
- 셰이더를 다음으로 변경하세요. "Legacy Shaders/Particles/Alpha Blended"
- 아래 텍스처를 여기에 할당합니다(또는 여기를 클릭):
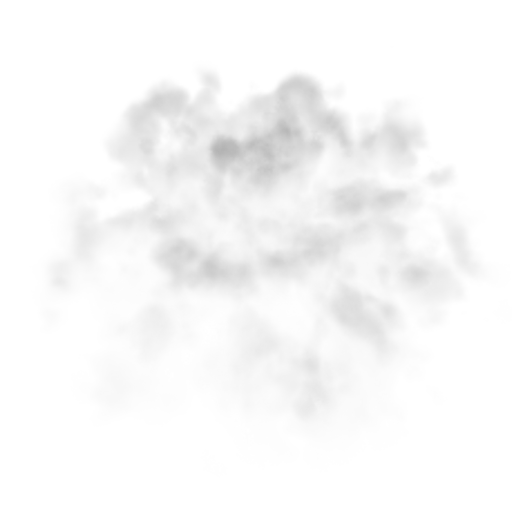
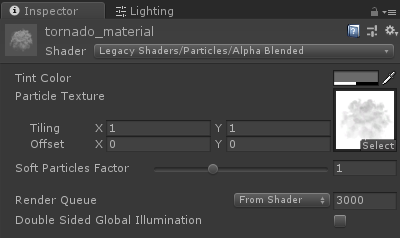
- tornado_material을 렌더러 모듈에 할당합니다.

이제 토네이도 입자는 다음과 같아야 합니다.
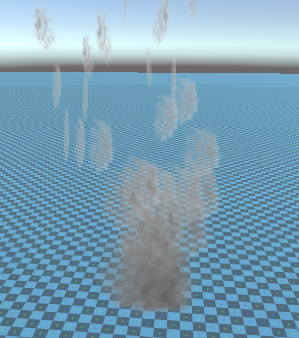
하지만 보시다시피 전혀 토네이도처럼 보이지 않습니다. 그 이유는 추가할 구성 요소가 하나 더 있기 때문입니다. 입자 시스템 역장입니다. 이 구성 요소는 원형 바람을 시뮬레이션하는 데 필요합니다.
- 새로운 GameObject를 생성하고 이름을 지정하세요. "ForceField"
- "ForceField"을 "Tornado" GameObject 내부로 이동하고 위치를 (0, 0, 0)으로 변경합니다.

- 파티클 시스템 포스 필드 구성요소를 추가합니다. "ForceField"
- Force Field 구성 요소의 값을 아래 스크린샷과 동일하게 변경합니다.
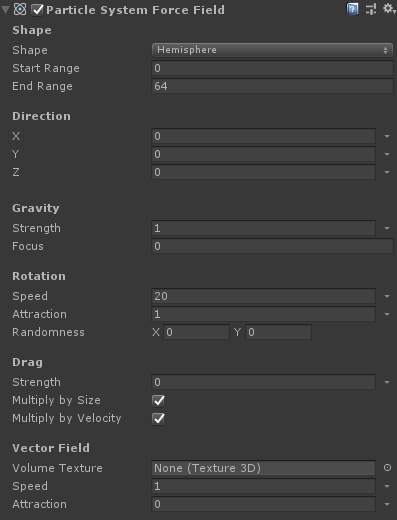
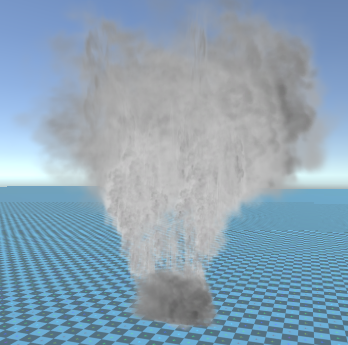
이제 입자는 다음과 같이 보일 것입니다. 훨씬 더 좋습니다.
3. 토네이도 물리학 설정
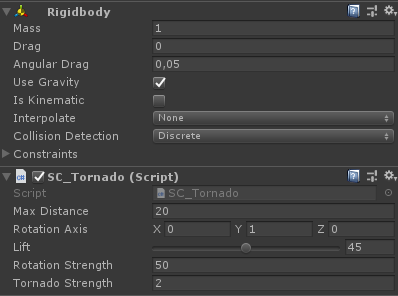
- "Tornado" GameObject에 Rigidbody 및 SC_Tornado 구성 요소 추가
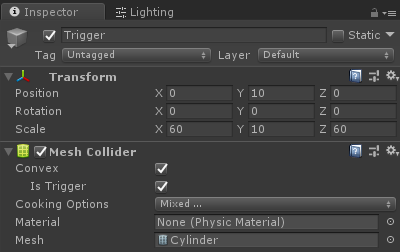
- 새로운 GameObject를 생성하고 이름을 지정하세요. "Trigger"
- "Tornado" GameObject 내부로 "Trigger"을 이동하고 위치를 (0, 10, 0)으로 변경하고 크기를 (60, 10, 60)으로 변경합니다.
- "Trigger" GameObject에 MeshCollider 구성 요소를 추가하고 Convex 및 IsTrigger 확인란을 선택한 다음 해당 메시를 기본 실린더로 변경합니다.
이제 토네이도가 준비되었습니다!
테스트하려면 간단히 큐브를 만들고 Rigidbody 구성 요소를 추가한 다음 트리거 영역 안에 배치하세요.
Play를 누르면 토네이도가 큐브를 끌어당겨야 합니다.
